How to Create and Manage DLP policies using PowerShell
Using data loss prevention (DLP) policies allows us to automatically identify, monitor, and protect sensitive information in Microsoft 365. This post will show you how to create and manage data loss prevention (DLP) policies using PowerShell. Important: You should use your global administrator or Compliance Administrator account to perform the following task.
PowerShell Workaround #
First, you must ensure the Exchange Online PowerShell V2 module is installed on your computer and then imported into your Powershell session. To do that, you should use the following commands.
Install-Module -Name ExchangeOnlineManagement
Import-Module -Name ExchangeOnlineManagement
Once you have imported the module, you are ready to start.
Connect to Security & Compliance Center PowerShell in a Microsoft 365 #
The easiest way to get started is to log in interactively at the command line. Replace <UPN> with your account in the user principal name format.
Connect-IPPSSession -UserPrincipalName <UPN>
Set the variables #
Here we define the basic information of the DLP Policy and DLP rule we want to create/manage.
$dlpPolicyName="DLP GlobalPolicy"
$dlpRuleName="Spain DNI Rule"
Create a Data Loss Prevention (DLP) Policy #
I’ll start by creating the DLP policy and using the New-DlpCompliancePolicy** cmdlet with the following syntax.
New-DlpCompliancePolicy `
    -Name $dlpPolicyName `
    -Mode TestWithNotifications `
    -ExchangeLocation All `
    -SharePointLocation All `
    -OneDriveLocation All
In this case, I create a DLP policy enforced across all SharePoint Online, Onedrive, and Exchange Online locations. When creating a new DLP policy, it is recommended to first set the mode to TestWithNotifications or TestWithoutNotifications, to know the impact of the policy before activating it.
Modify a Data Loss Prevention (DLP) Policy #
The policy should have a descriptive comment; To add a comment, you should use the Set-DlpCompliancePolicy cmdlet with the following syntax.
Set-DlpCompliancePolicy `
    -Identity $dlpPolicyName `
    -Comment "Primary policy applied to SharePoint Online, Onedrive, and Exchange Online locations."
Create a Data Loss Prevention (DLP) rule #
To create a DLP rule, you should use the New-DlpComplianceRule cmdlet with the following syntax.
New-DlpComplianceRule `
    -Name $dlpRuleName `
    -Policy $dlpPolicyName `
    -ContentContainsSensitiveInformation @{Name="Spain DNI";minCount="1"} `
    -BlockAccess $True
In this case, I created a new DLP compliance rule called “Spain DNI Rule” that maps to the previously created policy. The rule verifies the existence of at least one Spanish DNI and blocks access if found.
Sensitive Information Type list #
You can use the Get-DlpSensitiveInformationType cmdlet to list the sensitive information types defined for your organization in the Microsoft 365 compliance center. Sensitive information types are used in data loss prevention (DLP) rules to verify sensitive information, such as social security, passport, or credit card numbers.
Get-DlpSensitiveInformationType
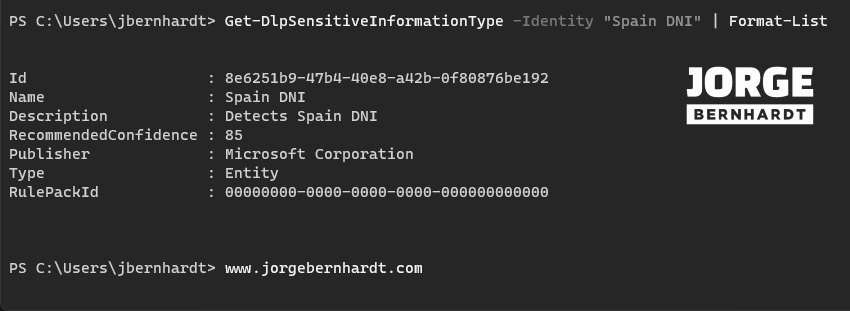
To get more information about a type of sensitive information, you can use the following command.
Get-DlpSensitiveInformationType `
    -Identity "Spain DNI" `
    | Format-List
Get Information about a DLP Policy #
You should use the Get-DlpCompliancePolicy cmdlet with the following syntax to obtain info about a DLP policy.
Get-DlpCompliancePolicy $dlpPolicyName `
    | Select-Object Name,Mode,Priority
If you want to know how to change the priority of DLP policies, check out this link.
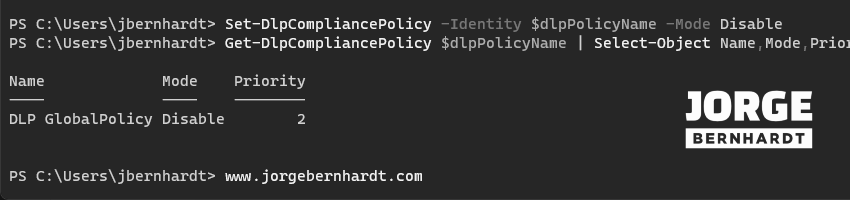
Change the mode parameter of the DLP policy #
The Mode parameter specifies the action and notification level of the DLP policy. Valid values are Enable, Disable, TestWithNotifications_ and TestWithoutNotifications.
Set-DlpCompliancePolicy `
    -Identity $dlpPolicyName `
    -Mode Disable
Delete a Data Loss Prevention (DLP) policy #
If you want to remove a Data Loss Prevention (DLP) policy, Use the Remove-DlpCompliancePolicy cmdlet.
Remove-DlpCompliancePolicy -Identity $dlpPolicyName
Thanks for reading my post. I hope you find it helpful. If you want to learn more about Data loss prevention (DLP) policies, check out this link.