Happy New Year everyone, life is short – let’s dream big and make the most of 2022!. In the year’s first article, I want to show you how to create shared mailboxes in Microsoft Exchange online and perform the most common administrative tasks using Powershell.
Important: To perform the tasks described below, your user must be a Global admin or belong to the Exchange admin group.
PowerShell Workaround
First, you need to ensure the ExchangeOnlineManagement module is installed on your computer and then import it into your Powershell session. To do that, you should use the following commands.
1 2 3 4 | Install-Module -Name ExchangeOnlineManagement Import-Module -Name ExchangeOnlineManagement |
Once you have imported the module, you are ready to start.
Connect to Exchange Online
The easiest way to get started is to log in interactively at the command line.
1 2 3 | Connect-ExchangeOnline |
Set the variables
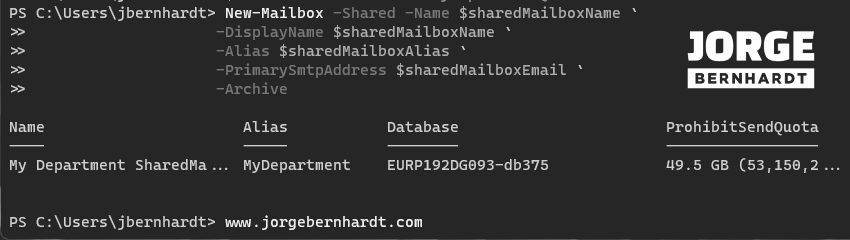
Here we define the basic information of the shared mailbox that we want to create/manage. You should replace <E-MAIL> with the mail you want to assign to the shared mailbox.
1 2 3 4 5 | $sharedMailboxName = "New Department SharedMailbox" $sharedMailboxAlias = "NewDepartment" $sharedMailboxEmail = "<E-MAIL>" |
Create the shared mailbox
I’ll start by creating the shared mailbox; I will use the New-Mailbox cmdlet with the following syntax.
1 2 3 4 5 6 7 | New-Mailbox -Shared -Name $sharedMailboxName ` -DisplayName $sharedMailboxName ` -Alias $sharedMailboxAlias ` -PrimarySmtpAddress $sharedMailboxEmail ` -Archive |
Manage mailbox permissions
After the mailbox is created, you need to give users permission to use the shared mailbox. Remember that only people within your organization can use a shared mailbox. You should use the Add-MailboxPermission cmdlet with the following syntax to add permissions to the shared mailbox.
1 2 3 4 5 6 7 | -Identity $sharedMailboxEmail ` -AccessRights FullAccess ` -InheritanceType All ` -AutoMapping:$false |
1 2 3 4 | Get-MailboxPermission -Identity $sharedMailboxEmail ` | Where-Object {($_.IsInherited -eq $false) -and -not ($_.User -like "NT AUTHORITY\SELF")} |
1 2 3 4 5 6 7 | -Identity $sharedMailboxEmail ` -AccessRights FullAccess ` -InheritanceType All ` -Confirm:$false |
Manage “Send as” permission
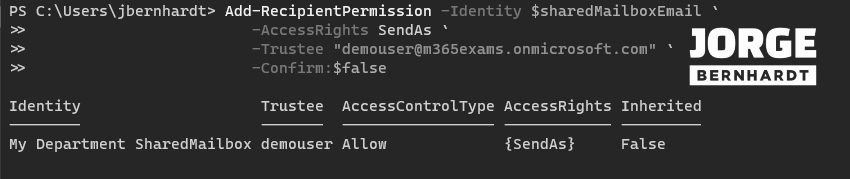
SendAs permission allows a user or group members to send messages that appear to come from the specified mailbox. To add SendAs permission to users, you should use the Add-RecipientPermission cmdlet with the following syntax.
1 2 3 4 5 6 | Add-RecipientPermission -Identity $sharedMailboxEmail ` -AccessRights SendAs ` -Confirm:$false |
To list the users who have SendAs permission on the shared mailbox, use the Get-RecipientPermission cmdlet.
1 2 3 4 | Get-RecipientPermission -Identity $sharedMailboxEmail ` | Where-Object {($_.IsInherited -eq $false) -and -not ($_.Trustee -like "NT AUTHORITY\SELF")} |
If you want to remove SendAs permission from a user or group, use the Remove-RecipientPermission cmdlet with the following syntax.
1 2 3 4 5 6 | Remove-RecipientPermission -Identity $sharedMailboxEmail ` -AccessRights SendAs ` -Confirm:$false |
Configure the shared mailbox
This section will show you how to carry out shared mailboxes’ most common administration tasks. To perform the following tasks, you should use the Set-Mailbox cmdlet.
Send on behalf of permissions
The GrantSendOnBehalfTo parameter specifies who can send on behalf of this mailbox.
1 2 3 4 |
1 2 3 | Get-Mailbox $sharedMailboxEmail | format-table Name, grantsendonbehalfto |
1 2 3 | Set-mailbox $sharedMailboxPrimarysmtp –Grantsendonbehalfto @{Remove="<E-MAIL>"} |
Shared mailbox email forwarding
The ForwardingSmtpAddress parameter specifies a forwarding SMTP address for messages that are sent to this mailbox.
1 2 3 4 5 6 | Set-mailbox $sharedMailboxEmail ` -ForwardingAddress "demouser" ` -DeliverToMailboxAndForward $true |
The DeliverToMailboxAndForward parameter determines how messages are delivered and forwarded.
$true: Messages are sent to this mailbox and forwarded to the specified email address.
$false: Messages are only forwarded to the specified email address. Messages are not delivered to this mailbox.
To get the address listing for email forwarding, use the following cmdlet.
1 2 3 4 | Get-Mailbox $sharedMailboxEmail ` | FL DeliverToMailboxAndForward,ForwardingAddress,ForwardingSmtpAddress |
If you want to disable Email Forwarding settings, you should use the following cmdlet.
1 2 3 4 5 6 | Set-mailbox $sharedMailboxEmail ` -ForwardingAddress $null ` -ForwardingsmtpAddress $null ` -DeliverToMailboxAndForward $false |
Manage sent items
Copy items sent as this mailbox, or on behalf of this mailbox, to the mailbox’s Sent Items folder. This lets shared mailbox members see the email other members have sent. If you don’t copy sent items to the mailbox, they will only be saved to the sender’s Sent Items folder. You should use the MessageCopyForSendOnBehalfEnabled and MessageCopyForSentAsEnabled parameters to set the desired settings.
1 2 3 4 5 | Set-mailbox $sharedMailboxEmail ` -MessageCopyForSentAsEnabled $True ` -MessageCopyForSendOnBehalfEnabled $True |
1 2 3 4 | Get-Mailbox $sharedMailboxEmail ` | FL MessageCopyForSentAsEnabled,MessageCopyForSendOnBehalfEnabled |
1 2 3 4 5 | Set-Mailbox $sharedMailboxEmail ` -MessageCopyForSentAsEnabled $false ` -MessageCopyForSendOnBehalfEnabled $false |
Manage automatic replies
To enable auto-reply messages (Out of Office), you should use the Set-MailboxAutoReplyConfiguration cmdlet with the following syntax.
1 2 3 4 5 | Set-MailboxAutoReplyConfiguration -Identity $sharedMailboxEmail ` -AutoReplyState Enabled ` -ExternalMessage "External auto-reply message." |
To get the existing auto-reply settings, you should use the Get-MailboxAutoReplyConfiguration cmdlet.
1 2 3 | Get-MailboxAutoReplyConfiguration -Identity $sharedMailboxEmail |
If you want to disable auto-reply messages, use the following cmdlet.
1 2 3 4 | Set-MailboxAutoReplyConfiguration -Identity $sharedMailboxEmail ` -AutoReplyState Disabled |
Manage email apps
You should use the Set-CASMailbox cmdlet to configure client access settings on a mailbox. Using this cmdlet, you can configure settings for Exchange ActiveSync, Outlook, Outlook on the web (OWA), POP3, and IMAP4.
To get the existing mail apps access settings, use the following cmdlet.
1 2 3 4 | Get-CASMailbox $sharedMailboxEmail ` | FL PopEnabled,ImapEnabled,MAPIEnabled,OWAEnabled,ActiveSyncEnabled,EWSEnabled |
For example, to disable the POP3 access for the shared mailbox, I should use the following cmdlet.
1 2 3 4 5 6 7 8 9 | Set-CASMailbox $sharedMailboxEmail ` -PopEnabled $false ` -ImapEnabled $true ` -MAPIEnabled $true ` -OWAEnabled $true ` -ActiveSyncEnabled $true ` -EWSEnabled $true |
Manage global address list visibility
To get the visibility of the shared mailbox in the address lists, use the following command.
1 2 3 | Get-Mailbox $sharedMailboxEmail | FL HiddenFromAddressListsEnabled |
To make the shared mailbox visible in address lists, use the value $false for the HiddenFromAddressListsEnabled parameter.
1 2 3 | Set-Mailbox -Identity $sharedMailboxEmail -HiddenFromAddressListsEnabled:$false |
Thanks for reading my post. I hope you find it helpful.
If you want to learn more About shared mailboxes, check out this link.