Setting Lifecycle Management Policy on Azure Storage using Azure CLI
In my last article, I showed you how to enable access time tracking on the Azure Storage Blob service. Today I want to show you how to take advantage of this functionality by setting up a data lifecycle management policy in your Azure storage account using Azure CLI. Microsoft Azure lifecycle policies allow you to define automatic data transition between different storage tiers. This provides flexible management of storage costs in the medium and long term. Important: Lifecycle management policies are supported for block blobs and append blobs in general purpose v2, premium block blob, and blob storage accounts. Lifecycle Management does not affect system containers like the $logs or $web containers.
Azure CLI Workaround #
In this case, we will use Azure Cloud Shell, a browser-based shell built into Azure Portal. This allows us to use the Azure command-line tools (Azure CLI and Azure PowerShell) directly from a browser. If you want to know more about Azure Cloud Shell, check out this link. Here we define our environment’s characteristics and the resources’ names.
resourceGroupName="RG-DEMO-NE"
storageAccountName="storageaccountdemone"
Check current settings #
First, we check the current configuration. To do this, you should use the following command.
az storage account management-policy show \
--account-name $storageAccountName \
--resource-group $resourceGroupName
This command should return an error message indicating that we don’t have any policies applied to our storage account.
Create a lifecycle management policy #
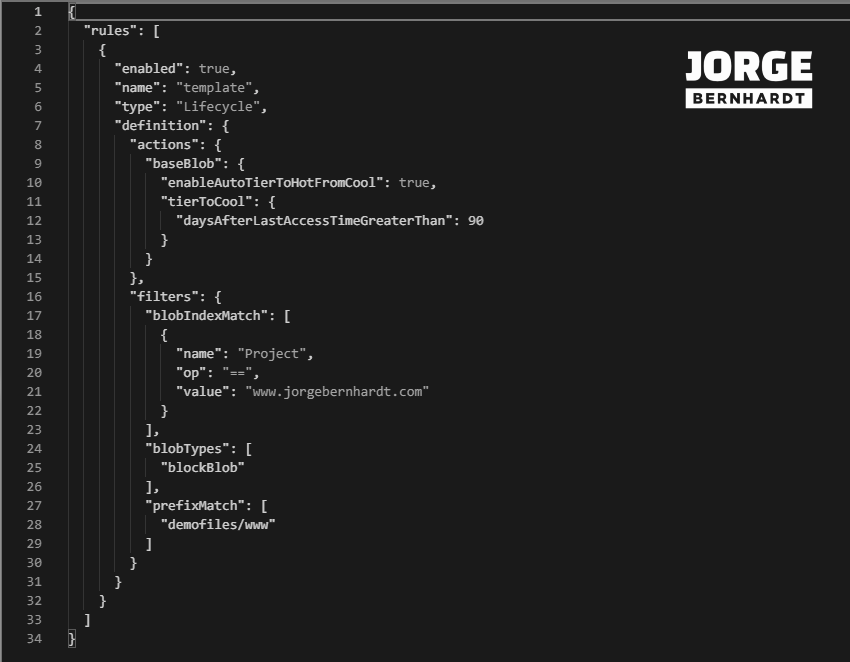
The policy’s definition is established through a .json file with the following structure. To create the policy file directly from the cloud shell (bash) console, I create the policy.json file and make the modifications using the embedded editor.
{
    "rules": \[
      {
        "enabled": true,
        "name": "DemoPolicy",
        "type": "Lifecycle",
        "definition": {
          "actions": {
          },
          "filters": {
          }
        }
      }
    \]
  }
The .json file has the “definitions” block and within it two blocks, “actions” and “filters. The configuration possibilities will depend on the blob type defined in the “filters” block.
Filters block #
Blob type #
- blockBlob
- appendBlob
"filters": {
          "blobTypes": \[
            "blockBlob"
          \]
        }
Blob prefix #
You can use this filter to narrow the policy action to a group of blobs instead of applying the policy to all your storage account. To search for items in a specific container, enter the container name followed by a slash, then the blob name or the first few letters.
"filters": {
            "blobTypes": \[
              "blockBlob"
            \],
            "prefixMatch": \[
              "demofiles/www"
            \]
          }
Blob index match #
You can filter the items to which the policy will be applied using the Blob index tags. But note that this filter can only be applied to the blob subtype “baseblob.”
"filters": {
  "blobIndexMatch": \[
    {
      "name": "project",
      "op": "==",
      "value": "www.jorgebernhardt.com"
    }
  \],
  "blobTypes": \[
    "blockBlob"
  \]
}
Actions block #
Blob Subtype #
Each action is applied individually on each blob subtype, as shown in the following example.
"definition": {
  "actions": {
    "baseBlob": {
      "tierToCool": {
        "daysAfterLastAccessTimeGreaterThan": 90
      }
    },
    "snapshot": {
      "tierToCool": {
        "daysAfterCreationGreaterThan": 180
      }
    }
  }
}
The available blob subtypes are:
- baseBlob
- snapshot
- version
Important: Note that the filters defined in the filters block apply to all actions, and not all blob subtypes support the same filters.
Actions #
The available actions are:
- “tierToArchive”
- “tierToCool”
- “delete”
- “enableAutoTierToHotFromCool”
The “enableAutoTierToHotFromCool” action is only available when the condition set is “daysAfterLastAccessTimeGreaterThan.”
Condition #
Once the action is chosen, we will select the condition that must be met to apply it.
- “daysAfterModificationGreaterThan”
- “daysAfterCreationGreaterThan”
- “daysAfterLastAccessTimeGreaterThan”
To have the “daysAfterLastAccessTimeGreaterThan” condition, it is necessary to have the “Access tracking” option enabled; if you want to know how to activate this feature, Check out this link.
"definition": {
  "actions": {
    "baseBlob": {
      "tierToCool": {
        "daysAfterLastAccessTimeGreaterThan": 90
      }
    }
  }
}
Once the configuration is complete, we will save the .json file from the embed editor to the cloud shell storage and then use the following command to apply the policy to the selected storage account.
az storage account management-policy create \
--account-name $storageAccountName \
--resource-group $resourceGroupName \
--policy @policy.json
Important: Note that it may take up to 48 hours for your new policy to take effect.
Get all the policy rules associated with your storage account #
With the following command, you can get the policies that apply to your storage account.
az storage account management-policy show \
--account-name $storageAccountName \
--resource-group $resourceGroupName
Rename a data policy rule #
Specific tasks can be performed without the need to modify the JSON file and reload it. One of them is the name change of the policy. Using the following command, you can modify the name of the policy.
az storage account management-policy update \
--account-name $storageAccountName \
--resource-group $resourceGroupName \
--set policy.rules[0].name="NewPolicyName"
Disable or Enable a data policy rule #
You can also enable and disable the policy using the following command.
az storage account management-policy update \
--account-name $storageAccountName \
--resource-group $resourceGroupName \
--set policy.rules[0].Enabled=false
Delete all the policy rules associated with your storage account #
Finally, if you want to remove all the policies that apply to your storage account, you should use the following command.
az storage account  management-policy delete \
--account-name $storageAccountName \
--resource-group $resourceGroupName
Thanks for reading my post. I hope you find it helpful.
Check out this link for more information on optimizing costs through automated data lifecycle management.