Logging into an Azure Linux VM using an Azure AD account
Today I want to show you how you can improve the security of your Linux virtual machines in Azure by integrating with Azure Active Directory (Azure AD) authentication. In this post, I’ll show you how to set up a Linux virtual machine and log in with Azure AD using openSSH certificate-based authentication. The configuration of the Linux virtual machine requires the following steps:
- Enable system-assigned managed identity.
- Install the AADSSHLoginForLinux VM extension
- Configure role assignments for the VM
The client’s computer should meet the following requirements:
- SSH client must support OpenSSH-based certificates for authentication.
- SSH extension for Azure CLI must be installed.
Azure PowerShell Workaround #
If you want to know how to install the PowerShell Azure module on your machine, check out this link. The simplest way to get started is to sign in interactively at the command line.
Connect-AzAccount
This cmdlet will bring up a dialog box prompting you for your email address and password associated with your Azure account. If you have more than one subscription associated with your mail account, you can choose the default subscription. To perform this task, we will use the following commands:
Get-AzSubscription
Select-AzSubscription -Subscription "My Subscription"
Once you set your default subscription, you’re ready to start.
Set the variables #
Here, we define the characteristics of our environment and the resource’s properties.
$resourceGroupName="RG-DEMO"
$vmName="VM-DEMO"
$location="northeurope"
Enable system-assigned managed identity #
To enable the identity of the managed service on your virtual machine, you should use the Update-AzVM cmdlet with the following syntax.
$vm = Get-AzVM  `
  -Name $vmName `
  -ResourceGroupName $resourceGroupName

Update-AzVM `
  -ResourceGroupName $resourceGroupName `
  -VM $vm `
  -IdentityType SystemAssigned
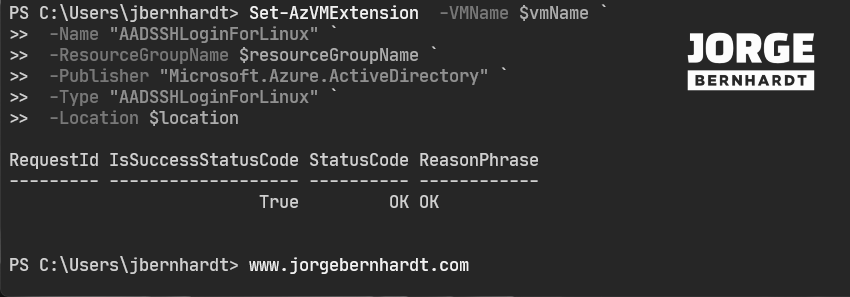
Install the AADSSHLoginForLinux VM extension #
To install the required extension on your Linux virtual machine, you should use the Set-AzVMExtension cmdlet with the following syntax.
Set-AzVMExtension  `
  -VMName $vmName `
  -Name "AADSSHLoginForLinux" `
  -ResourceGroupName $resourceGroupName `
  -Publisher "Microsoft.Azure.ActiveDirectory" `
  -Type "AADSSHLoginForLinux" `
  -Location $location
Configure role assignments for the VM #
In the last step, you should assign the Azure AD user to one of the following roles in the Virtual Machine Resource: “Virtual Machine administrator login” or “Virtual Machine user login.” To do this, you should use the following commands:
$vmid=(Get-AzVM `
  -Name $vmName `
  -ResourceGroupName $resourceGroupName).Id

New-AzRoleAssignment `
  -SignInName <emailAddress> `
  -RoleDefinitionName  <RoleName> `
  -scope $vmid
Remember to replace <emailAddress> and <roleName> with your configuration values.
Azure CLI Workaround #
In this case, we will use Azure Cloud Shell, a browser-based shell built into Azure Portal. This allows us to use the Azure command-line tools (Azure CLI and Azure PowerShell) directly from a browser. If you want to know more about Azure Cloud Shell, check out this link. Important: If you choose to use the CLI locally, you must be running the Azure CLI version 2.22.1 or later. First, we define the characteristics of our environment and store the values in variables.
resourceGroupName="RG-DEMO"
vmName="VM-DEMO"
Enable system-assigned managed identity #
To enable the identity of the managed service on your virtual machine, you should use the following command.
az vm identity assign \
-n $vmName \
-g $resourceGroupName
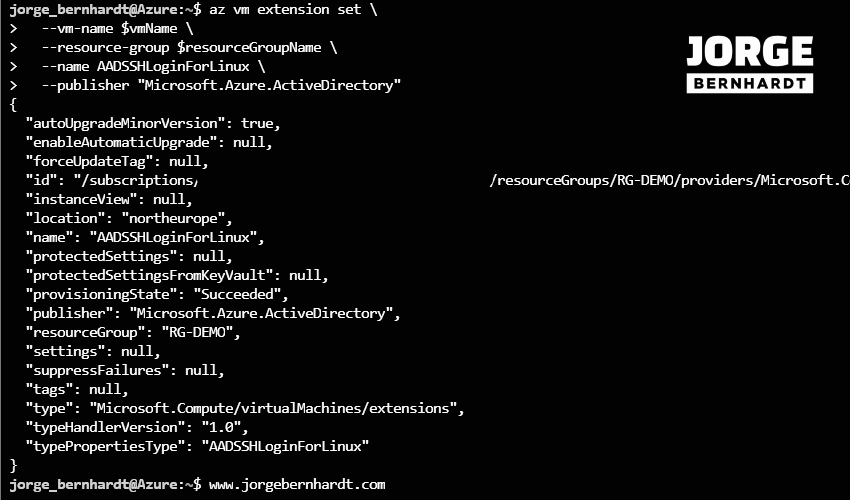
Install the AADSSHLoginForLinux VM extension #
To install the required extension on your Linux virtual machine, you should use the following command.
az vm extension set \
--vm-name $vmName \
--resource-group $resourceGroupName \
--name AADSSHLoginForLinux \
--publisher "Microsoft.Azure.ActiveDirectory"
Configure role assignments for the VM #
In the last step, you should assign the Azure AD user to one of the following roles in the Virtual Machine Resource: “Virtual Machine administrator login” or"Virtual Machine user login." To do this, you should use the following commands:
vmid=$( az vm show \
-g $resourceGroupName \
-n $vmName \
--query "id" --output tsv)

az role assignment create \
--assignee <emailAddress> \
--role <roleName> \
--scope $vmid
Remember to replace <emailAddress> and <roleName> with your configuration values.
Sign in to the Linux VM with your Azure AD account #
Once the required configurations have been made in the Linux virtual machine in Azure, you can initiate the connection from the client station. In my case, I will use Azure CLI locally, but if you prefer, you can use Azure Cloud Shell.
Important: If you want to use Az Cloud Shell to connect to virtual machines, you will not need to install anything locally on your client machine. First, you need to check if your Azure CLI version is 2.22.1 or later. To do this, you should execute the following command.
az --version
And then, by running the following command, you install the SSH extension for the Azure CLI.
az extension add \
--name ssh
Finally, you must run az login and go through an interactive sign-in flow with the user that will log into the VM. Once logged in, you should run the following commands to log in to the Linux VM.
az ssh vm \
-n VM-DEMO \
-g RG-DEMO
Thanks for reading my post. I hope you find it helpful.
For more information about this topic, check this link.