Creating Azure action groups from the command line
Today, I will show you how to create, list, update and delete Azure action groups using PowerShell and Azure CLI. Action groups are separate and independent resources in which you define a collection of notification preferences. Once created, you can use them across multiple alert rules within an Azure Resource Group. Each action group has: Name: The action Group name must be unique within a Resource Group.
- Short name (Display name): This name is used to identify the action group in emails and SMS and is limited to 12 characters.
- Notifications: Defines the method by which users will be notified when the action group is triggered.
- Actions: Defines the actions used when the action group is triggered.
Prerequisites
- This tutorial assumes that you already have a Microsoft Azure account configured.
Azure PowerShell Workaround #
If you want to know how to install the PowerShell Azure module on your machine, check out this link. The simplest way to get started is to sign in interactively at the command line.
Connect-AzAccount
This cmdlet will bring up a dialog box prompting you for your email address and password associated with your Azure account. If you have more than one subscription associated with your mail account, you can choose the default subscription. To perform this task, we will use the following commands:
Get-AzSubscription
Select-AzSubscription -Subscription "My Subscription"
Once you set your default subscription, you’re ready to start.
Set the variables #
Here, we define the characteristics of our environment and the resource’s properties.
$resourceGroupName="RG-DEMO-WE"
$actionGroupName="AG-DEMO-WE"
$actionshortName="AGDEMOWE"
Configure action group settings #
To create a new action group, you should first use the New-AzActionGroupReceiver cmdlet to configure the notifications and actions settings.
Notifications settings
In this example, you configure the settings for email notifications and SMS messages.
$emailReceiver = New-AzActionGroupReceiver `
    -Name 'jorge-email' `
    -EmailReceiver `
    -EmailAddress '[email protected]'

$smsReceiver = New-AzActionGroupReceiver `
    -Name 'jorge-sms' `
    -SmsReceiver `
    -CountryCode '34' `
    -PhoneNumber '0000000000'
Actions settings
Regarding the actions section, here you establish the configuration of a webhook.
$webhookReceiver = New-AzActionGroupReceiver `
    -Name 'jorge-web_hook' `
    -WebhookReceiver `
    -ServiceUri 'https://jorgebernhardt.com/alert'
Tags To add the tags to the resource, you must create a dictionary object and then add the value pair (key, value) to the object.
$tag = New-Object "System.Collections.Generic.Dictionary``2[System.String,System.String]"
$tag.Add('environment', 'www.jorgebernhardt.com')
Create the action group #
Once the action and notification options are set, you must use the Set-AzActionGroup cmdlet to create the action group.
Set-AzActionGroup `
    -Name $actionGroupName `
    -ResourceGroup $resourceGroupName `
    -ShortName $actionshortName `
    -Receiver $emailReceiver, $smsReceiver, $webhookReceiver `
    -Tag $tag
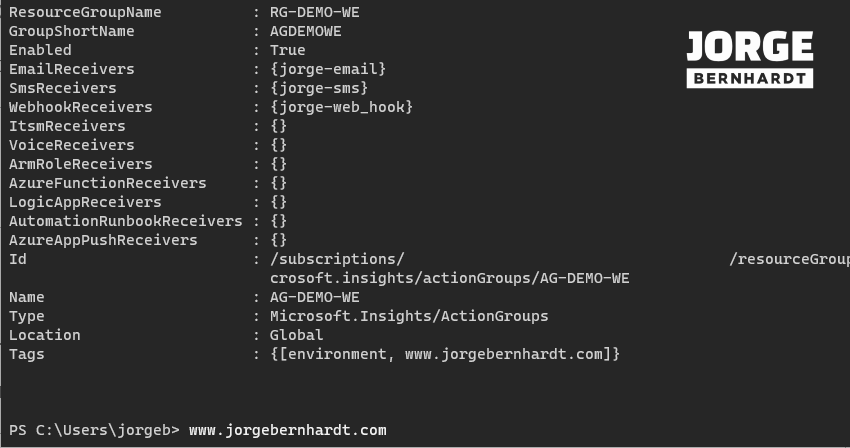
List all Azure action groups. #
To list all available action groups within a resource group, you should use the Get-AzActionGroup cmdlet.
Get-AzActionGroup -ResourceGroupName $resourceGroupName
Remove an Azure action group. #
Finally, to delete an action group, you should use the Remove-AzActionGroup cmdlet with the following syntax.
Remove-AzActionGroup  `
    -Name $actionGroupName `
    -ResourceGroupName $resourceGroupName
Azure CLI Workaround #
In this case, we will use Azure Cloud Shell, a browser-based shell built into Azure Portal. This allows us to use the Azure command-line tools (Azure CLI and Azure PowerShell) directly from a browser. If you want to know more about Azure Cloud Shell, check out this link.
Creates an Action group #
Unlike PowerShell, in Azure CLI, you use a single command to create a new action group. Using the following command, you create the action group and configure the notifications and actions settings.
az monitor action-group create \
--name 'AG-DEMO-WE' \
--resource-group 'RG-DEMO-WE' \
--short-name 'AG-DEMO' \
--action email jorge-email [email protected] \
--action sms jorge-sms 34 0000000000 \
--tags Environment="www.JorgeBernhardt.com"
Updates an Action group #
To update an existing action group, you should use the following command.
az monitor action-group update \
--name 'AG-DEMO-WE' \
--resource-group 'RG-DEMO-WE' \
--short-name 'AG-DEMO' \
--add-action webhook jorge-web_hook https://jorgebernhardt.com/alert \
--tags Environment="www.JorgeBernhardt.com"
The above example adds the webhook action configuration to the previously created action group.
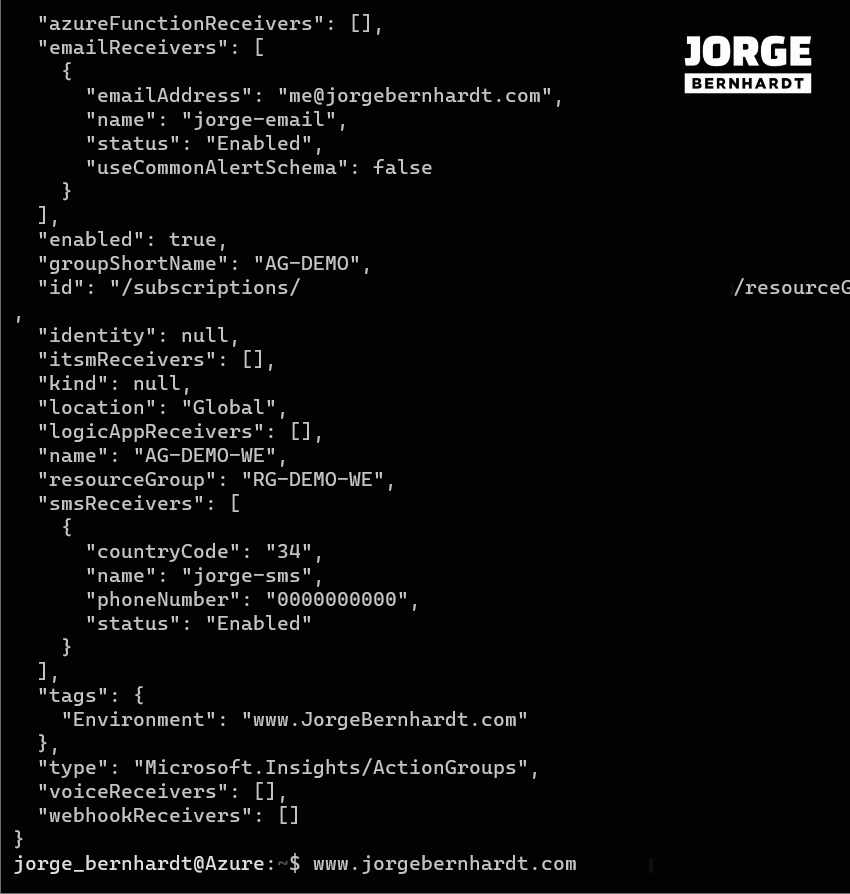
List all Action groups. #
To list all action groups, you should use the following command.
az monitor action-group list
If you want to view a particular action group’s properties, you should use the following command.
az monitor action-group show \
--name 'AG-DEMO-WE' \
--resource-group 'RG-DEMO-WE'
Removes an Action group #
Finally, to delete an action group, you should use the following command.
az monitor action-group delete \
--name 'AG-DEMO-WE' \
--resource-group 'RG-DEMO-WE'
Thanks for reading my post. I hope you find it helpful. If you want to know more about Azure action groups, check out this link.