How to configure Azure Firewall diagnostic settings
Hey, guys, following the series of publications on Azure Firewall, today I’ll show you How to configure Azure Firewall Diagnostics to send logs and metrics to a storage account using PowerShell and the Azure CLI.
Prerequisites #
- This tutorial assumes that you already have an Azure Storage account. You can use an existing Storage Account, or if you want to create a new one, check out this link.
- This tutorial assumes that you already have an Azure Firewall. You can use an existing Firewall, or if you want to create a new one, check out this link.
Important: The storage account must be in the same subscription as your Azure Firewall. #
In the following examples, I will set the retention policy to 365 days, but if you do not want to apply any retention policy and retain data forever, set retention (days) to 0.
Azure PowerShell Workaround #
The simplest way to get started is to sign in interactively at the command line.
Connect-AzAccount
This cmdlet will bring up a dialog box prompting you for your email address and password associated with your Azure account. If you have more than one subscription associated with your mail account, you can choose the default subscription. To perform this task, we will use the following commands:
Get-AzSubscription
Select-AzSubscription -Subscription "My Subscription"
Once you set your default subscription, you’re ready to start.
Set the variables #
Here, we define the characteristics of our environment and the resource’s properties.
$resourceGroupName="RG-DEMO-HUB"
$firewallName="FW-DEMO-WE"
$storageAccountName="storageaccountdemohub"
To improve the visualization of the following commands, I will store the resources into variables.
$firewall= Get-AzFirewall `
    -ResourceGroupName $ResourceGroupName `
    -Name $firewallName
$storageaccount = Get-AzStorageAccount `
    -ResourceGroupName $resourceGroupName `
    -StorageAccountName $storageAccountName
Sets the logs and metrics settings for the Firewall #
To store the event log for the resource, you must use the Set-AzDiagnosticSetting cmdlet with the following syntax. For this particular resource, four service-specific records are available: AzureFirewallApplicationRule, AzureFirewallNetworkRule, and AzureFirewallDnsProxy.
Set-AzDiagnosticSetting `
    -ResourceId $firewall.Id \`
    -storageAccountId $storageaccount.Id `
    -Enabled $true `
    -Category AzureFirewallApplicationRule `
    -RetentionEnabled $true `
    -RetentionInDays 365

Set-AzDiagnosticSetting `
    -ResourceId $firewall.Id `
    -storageAccountId $storageaccount.Id `
    -Enabled $true `
    -Category AzureFirewallNetworkRule `
    -RetentionEnabled $true `
    -RetentionInDays 365

Set-AzDiagnosticSetting `
    -ResourceId $firewall.Id `
    -storageAccountId $storageaccount.Id `
    -Enabled $true `
    -Category AzureFirewallDnsProxy `
    -RetentionEnabled $true `
    -RetentionInDays 365
If you also want to store the metric record for the resource, you must use the Set-AzDiagnosticSetting cmdlet with the following syntax.
Set-AzDiagnosticSetting `
    -ResourceId $firewall.Id `
    -storageAccountId $storageaccount.Id `
    -Enabled $true `
    -MetricCategory AllMetrics `
    -RetentionEnabled $true `
    -RetentionInDays 365
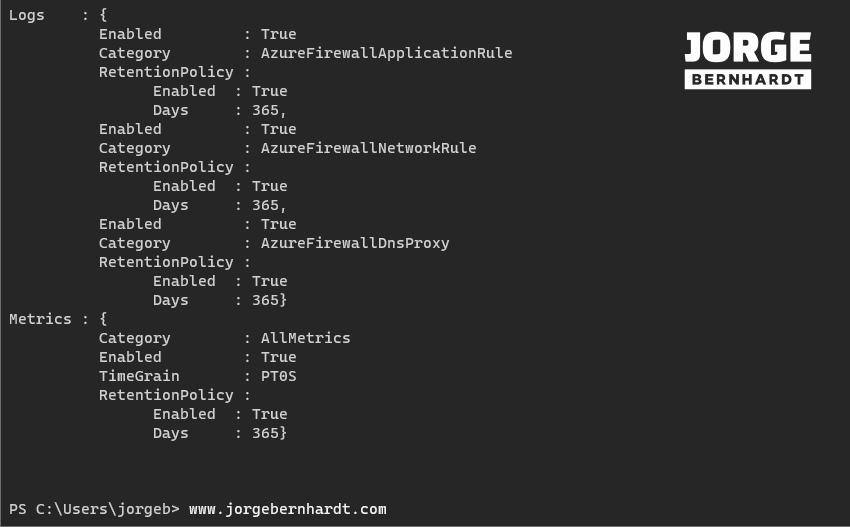
Verify the changes made #
To verify the established diagnostic settings, you should use the Get-AzDiagnosticSetting cmdlet with the following syntax.
Get-AzDiagnosticSetting `
    -ResourceId $firewall.Id `
    | Select-Object Logs, Metrics `
    |Format-List
Remove diagnostic settings #
If you want to remove the diagnostic setting for the Azure Firewall resource, you should use the Remove-AzDiagnosticSetting cmdlet with the following syntax.
Remove-AzDiagnosticSetting -ResourceId $firewall.Id
Azure CLI Workaround #
In this case, we will use Azure Cloud Shell, a browser-based shell built into Azure Portal. This allows us to use the Azure command-line tools (Azure CLI and Azure PowerShell) directly from a browser. If you want to know more about Azure Cloud Shell, check out this link. First, we define the characteristics of our environment and store the values in variables.
resourceGroupName="RG-DEMO-HUB"
firewallName="FW-DEMO-WE"
storageAccountName="storageaccountdemohub"
To improve the visualization of the following commands, I will store the resources into variables.
stoaccountid=$(az storage account show --name $storageAccountName --resource-group $resourceGroupName --query id --output tsv)
firewallid=$(az network firewall show --name $firewallName --resource-group $resourceGroupName --query id --output tsv)
Sets the logs and metrics settings for the Firewall #
To store the event logs and metrics for the resource, you should use the following command.
az monitor diagnostic-settings create \
--storage-account $stoaccountid \
--resource $firewallid \
--name "Firewall Diagnostic" \
--logs '[{"category":"AzureFirewallNetworkRule","enabled":true,"retentionPolicy":{"days":"365","enabled":true}},{"category":"AzureFirewallApplicationRule","enabled":true,"retentionPolicy":{"days":"365","enabled":true}},{"category":"AzureFirewallDnsProxy","enabled":true,"retentionPolicy":{"days":"365","enabled":true}}]' \
--metrics '[{"category": "AllMetrics","enabled": true,"retentionPolicy":{"days":"365","enabled":true}}]'
Verify the changes made #
To verify the established diagnostic settings, you should use the following command.
az monitor diagnostic-settings list \
--resource $firewallid \
-o yaml

Remove diagnostic settings #
If you want to remove the diagnostic setting for the Azure Firewall resource, you should use the following commands.
az monitor diagnostic-settings delete \
--name "Firewall Diagnostic" \
--resource $firewallid
Thanks for reading my post. I hope you find it helpful. If you want to know more about Azure Firewall, check out this link.