How to deploy an Azure Firewall in an existing VNet
This is the first post in a series of articles where I will show you how to manage an Azure Firewall using PowerShell and Azure CLI. In this first post, I want to show you how to deploy an Azure Firewall in an existing virtual network.
Azure Firewall is a cloud-based security service that protects your Azure virtual network resources from incoming and outgoing threats.
During the Firewall deployment process, you will need to create two resources: a dedicated subnet in your virtual network with the following characteristics:
- The name of the dedicated subnet must be AzureFirewallSubnet.
- The size of the AzureFirewallSubnet must be /26.
and a public IP that must meet the following characteristics:
- Azure Firewall supports only static standard public IPs.
Important: The firewall, VNet, and the public IP address must be in the same resource group.
Prerequisites
- You already created the necessary Virtual Network and subnet. If you want to know how to create a Virtual Network, check out this link.
Azure PowerShell Workaround #
If you want to know how to install the PowerShell Azure module on your machine, check out this link. The simplest way to get started is to sign in interactively at the command line.
Connect-AzAccount
This cmdlet will bring up a dialog box prompting you for your email address and password associated with your Azure account. If you have more than one subscription associated with your mail account, you can choose the default subscription. To perform this task, we will use the following commands:
Get-AzSubscription
Select-AzSubscription -Subscription "My Subscription"
Once you set your default subscription, you’re ready to start.
Set the variables #
Here, we define the characteristics of our environment and the resource’s properties.
$location="westeurope"
$resourceGroupName="RG-DEMO-WE"
$vnetName= "VNET-DEMO-WE"
$fwSubnetname = "AzureFirewallSubnet"
$fwAdressPrefix = '10.1.1.0/26'
Add a dedicated subnet in the existing VNET #
You should create a new subnet in your network configuration, and it must be called “AzureFirewallSubnet”. To do this, use the Add-AzVirtualNetworkSubnetConfig cmdlet with the following syntax.
$vnet = Get-AzVirtualNetwork `
    -Name $vnetName `
    -ResourceGroupName $resourceGroupName

Add-AzVirtualNetworkSubnetConfig `
    -Name $fwSubnetname `
    -AddressPrefix $fwAdressPrefix `
    -VirtualNetwork $vnet

$vnet | Set-AzVirtualNetwork

$vnet = Get-AzVirtualNetwork `
    -Name $vnetName `
    -ResourceGroupName $resourceGroupName
Request a Public IP address #
One of the resources you need to configure your Firewall is a public IP. To create this resource, you should use the New-AzPublicIpAddress cmdlet with the following syntax.
$fwpip = New-AzPublicIpAddress `
    -name "PIP-Firewall-WE" `
    -ResourceGroupName $resourceGroupName `
    -location $location \`
    -AllocationMethod Static `
    -Sku Standard `
    -Tag @{"environment"="www.jorgebernhardt.com"}
Deploy an Azure Firewall #
Once the above steps have been completed successfully, you are ready to deploy your Firewall on your virtual network. To do this, you must use the New-AzFirewall cmdlet with the following syntax.
New-AzFirewall `
    -Name "FW-DEMO-WE" `
    -ResourceGroupName $resourceGroupName `
    -Location $location `
    -Sku "AZFW\_VNet" `
    -PublicIpAddress $FWpip `
    -Tag @{"environment"="www.jorgebernhardt.com"}
The -SKU parameter accepts the AZFW_VNet value and AZFW_Hub value to attach the azure firewall to vhub.
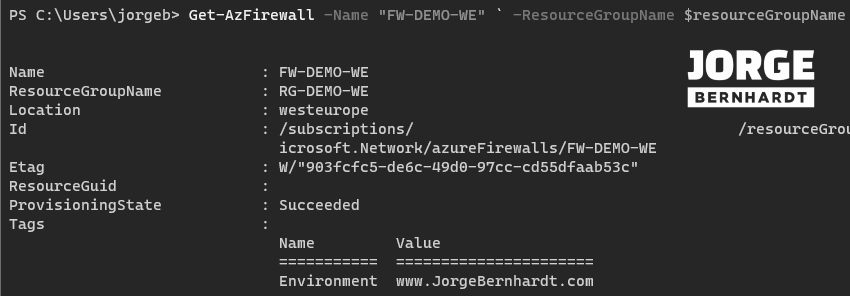
Check the Azure firewall settings #
To get the information of the deployed resource, you can use the Get-AzFirewall cmdlet with the following syntax.
Get-AzFirewall `
    -Name "FW-DEMO-WE" `
    -ResourceGroupName $resourceGroupName
Delete the Azure Firewall #
If you want to remove the resource from the firewall for some reason, you should use the Remove-AzFirewall cmdlet with the following syntax.
Remove-AzFirewall `
    -Name "FW-DEMO-WE" `
    -ResourceGroupName $resourceGroupName `
    -Force
Important: note that the created subnet and public IP will not be erased when removing the firewall resource.
Azure CLI Workaround #
In this case, we will use Azure Cloud Shell, a browser-based shell built into Azure Portal. This allows us to use the Azure command-line tools (Azure CLI and Azure PowerShell) directly from a browser. If you want to know more about Azure Cloud Shell, check out this link. First, we define the characteristics of our environment and store the values in variables.
location="westeurope"
resourceGroupName="RG-DEMO-WE"
vnetName="VNET-DEMO-WE"
fwSubnetname="AzureFirewallSubnet"
fwAdressPrefix='10.1.1.0/26'
Add a dedicated subnet in the existing VNET #
You should create a new subnet in your network configuration, and it must be called “AzureFirewallSubnet”. To do this, use the following commands.
az network vnet subnet create \
-n $fwSubnetname \
-g $resourceGroupName \
--vnet-name $vnetName \
--address-prefixes $fwAdressPrefix
Request a Public IP address #
To create a public IP address for Azure Firewall, you should use the following command.
az network public-ip create  \
-n "PIP-Firewall-WE" \
-g $resourceGroupName \
--sku Standard \
--allocation-method Static \
--tags Environment="www.JorgeBernhardt.com"
Deploy an Azure Firewall #
The deployment of this resource using Azure CLI must be done in two steps. First, we perform the deployment of the Azure Firewall without the network configurations.
az network firewall create \
-n "FW-DEMO-WE" \
-g $resourceGroupName \
-l $location \
--sku  AZFW\_VNet \
--tier "Standard" \
--tags Environment="www.JorgeBernhardt.com"
The Firewall SKU value cannot be updated after creation. The -SKU parameter accepts the AZFW_VNet value and AZFW_Hub value to attach the Azure firewall to vhub.
Set the basic network settings #
And once the resource is deployed, we establish the basic network configurations using the following command.
az network firewall ip-config create \
--name FW-ipconfig \
--firewall-name "FW-DEMO-WE" \
--public-ip-address "PIP-Firewall-WE" \
--resource-group $resourceGroupName \
--vnet-name $vnetName

az network firewall update \
-n "FW-DEMO-WE" \
-g $resourceGroupName
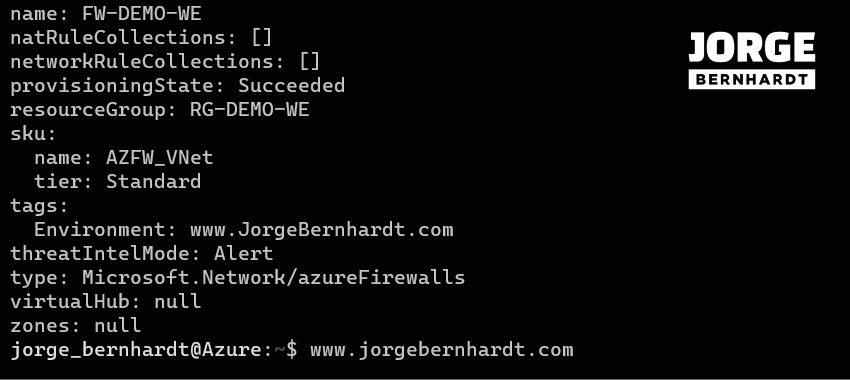
Check the Azure firewall settings #
To get the information of the deployed resource, you can use the following command.
az network firewall show \
-n "FW-DEMO-WE" \
-g $resourceGroupName \
-o yaml
Delete the Azure Firewall #
If for some reason, you want to remove the firewall resource, you should use the following command.
az network firewall delete \
--name  "FW-DEMO-WE" \
--resource-group  $resourceGroupName
Important: Note that the created subnet and public IP will not be erased when removing the firewall resource. In the following posts, I will explain how to set different configurations and management tasks in Azure Firewall using PowerShell and Azure CLI. If you want to know more about Azure Firewall, check out this link.