How to create an Azure Service Principal with Password
Hello, guys. Today I want to show you how to create a service principal using PowerShell and Azure CLI. In case you don’t know, an Azure service identity is an identity that is created in Azure AD and associated with an application. The Azure service principal allows us Azure AD applications to interact with Azure resources as a user principal. This can be useful when you have resources or applications that need to manage other resources in Azure. Using role-based access control (RBAC) allows you to grant them access to Azure resources in subscription, resource group, or resource scope. Important: For security reasons, Microsoft recommends using service principals with automated tools rather than allowing them to log in with a user identity.
Prerequisites #
- You must have permission to be able to create an application in Azure AD and assign the service principal to a role.
Azure PowerShell Workaround #
If you want to know how to install the PowerShell Azure module on your machine, check out this link. The simplest way to get started is to sign in interactively at the command line.
Connect-AzAccount
This cmdlet will bring up a dialog box prompting you for your email address and password associated with your Azure account. If you have more than one subscription associated with your mail account, you can choose the default subscription. To perform this task, we will use the following commands:
Get-AzSubscription
Select-AzSubscription -Subscription "My Subscription"
Once you set your default subscription, you are ready to start.
Set the variables #
Here, we define the characteristics of our environment and the resource’s properties. Replace
$resourceGroupName = "RG-DEMO-WE"
$spName = "SP-DEMO-WE"
$spPassword = "<Password>"
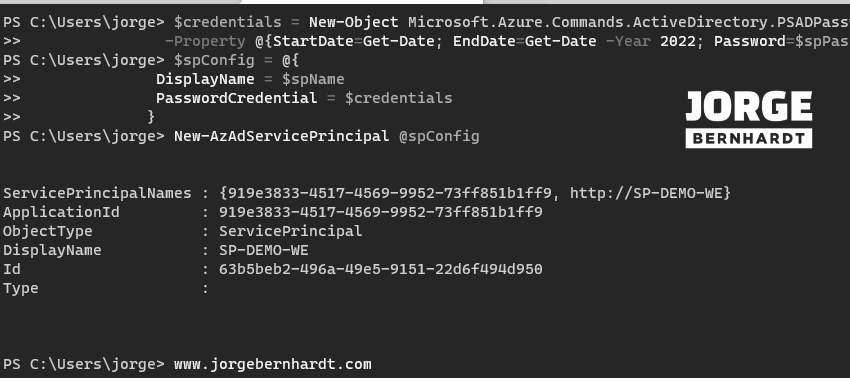
$credentials = New-Object Microsoft.Azure.Commands.ActiveDirectory.PSADPasswordCredential `
-Property @{StartDate=Get-Date; EndDate=Get-Date -Year 2022; Password=$spPassword};
$spConfig = @{
DisplayName = $spName
PasswordCredential = $credentials
}
Create an Azure Service Principal #
To create a service principal with a password, you should use the New-AzAdServicePrincipal cmdlet with the following syntax.
$servicePrincipal = New-AzAdServicePrincipal @spConfig
Assign a Role to the Service Principal #
Once the service principal is created, you should assign the role and its scope. To do this, you should use the New-AzRoleAssignment with the following syntax. In the first example, we created the service principal with the Contributor role at the subscription level.
$subscriptionId = (Get-AzContext).Subscription.Id
$spRoleAssignment = @{
                      ObjectId = $servicePrincipal.id;
                      RoleDefinitionName = 'Contributor';
                      Scope = "/subscriptions/$subId"
                     }
New-AzRoleAssignment @spRoleAssignment
In this second example, we assign the service principal the role of the reader at the resource group level.
$subscriptionId = (Get-AzContext).Subscription.Id
$spRoleAssignment = @{
                      ObjectId = $servicePrincipal.id;
                      RoleDefinitionName = 'Reader';
                      Scope = "/subscriptions/$subscriptionId/resourceGroups/$resourceGroupName"
                     }
New-AzRoleAssignment @SpRoleAssignment
Verify access using Azure Service Principal identity #
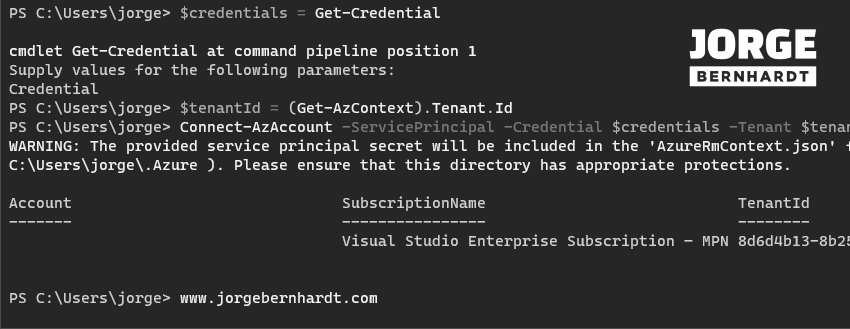
To log in with a service principal, you need the applicationId as the username and the password value associated with the service principal.
$servicePrincipal.ApplicationId
$credentials = Get-Credential
$tenantId = (Get-AzContext).Tenant.Id
To connect to Azure using the credentials of the service principal, you should use the Connect-AzAccount cmdlet with the following syntax.
Connect-AzAccount `
    -ServicePrincipal `
    -Credential $credentials `
    -Tenant $tenantId
Delete a Service Principal #
if you want to remove the service principal, you should use the Remove-AzADApplication cmdlet with the following syntax.
$servicePrincipal=Get-AzADServicePrincipal `
    -DisplayName $spName

Remove-AzADApplication `
    -ApplicationId $servicePrincipal.ApplicationId
Azure CLI Workaround #
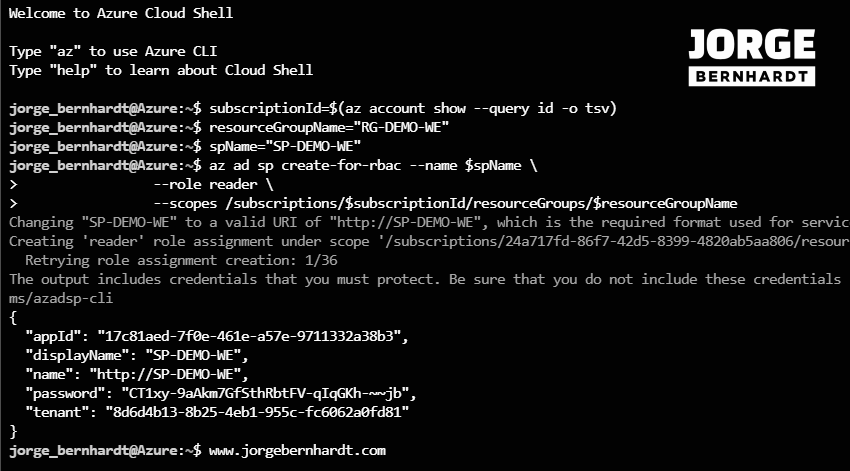
In this case, we will use Azure Cloud Shell, a browser-based shell built into Azure Portal. This allows us to use the Azure command-line tools (Azure CLI and Azure PowerShell) directly from a browser. If you want to know more about Azure Cloud Shell, check out this link. First, we define the characteristics of our environment and store the values in variables.
subscriptionId=$(az account show --query id -o tsv)
resourceGroupName="RG-DEMO-WE"
spName="SP-DEMO-WE"
Create an Azure Service Principal #
In Azure CLI, the process of creating a Service principal is something different. Using a single command, we create and assign the role and scope of the service and as a result of the creation, we receive the information about the service, including a self-generated password. Using the following command, we create the service principal with the contributor role at the subscription level.
az ad sp create-for-rbac \
--name $spName \
--role contributor \
--scopes /subscriptions/$subscriptionId
In this second example, we assign the service principal the role of reader at the resource group level.
az ad sp create-for-rbac \
--name $spName \
--role reader \
--scopes /subscriptions/$subscriptionId/resourceGroups/$resourceGroupName
Verify access using Azure Service Principal identity #
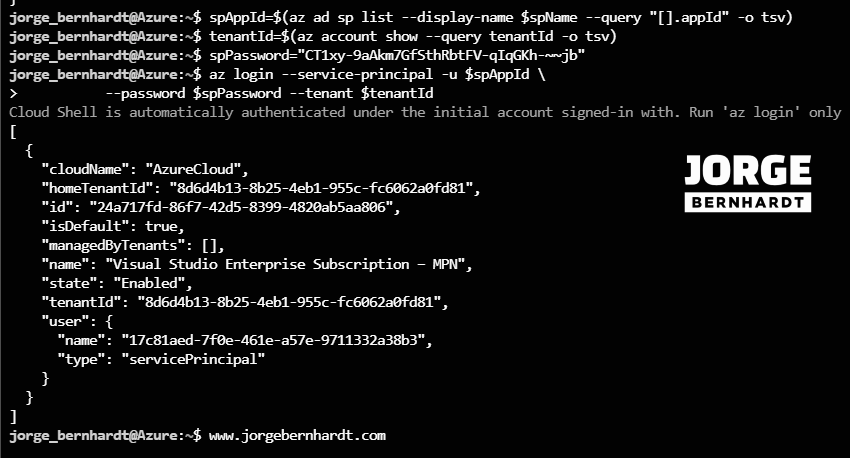
To log in with a service principal, you need the applicationId as the username and the password value associated with the service principal. Replace
spName="SP-DEMO-WE"
spPassword="<Password>"
spAppId=$(az ad sp list --display-name $spName --query "\[\].appId" -o tsv)
tenantId=$(az account show --query tenantId -o tsv)
To connect to Azure using the credentials of the service principal, you should use the following command.
az login \
--service-principal \
-u $spAppId \
--password $spPassword \
--tenant $tenantId
Delete a Service Principal #
If you want to remove the service principal, you should use the following command.
az ad sp delete \
--id $spAppId
Thanks for reading my post. I hope you find it useful.
If you want to know more about Azure service principal objects in Azure Active Directory, check out this link.