How to install IIS on Windows Server with SSL using PowerShell
Today I want to show you how to install Internet Information Server (IIS) on my favorite operating system, Windows Server using PowerShell. IIS is a great feature that allows us to provide our server with an extensible web server. Like other Windows Server features, we have PowerShell-specific cmdlets to manage IIS, such as the “WebAdministration” module and the more recent “IISAdministration.”
PowerShell Workaround #
Requirements:
- PowerShell version 3.0 or higher.
- You must be logged on to a server as an administrator to install or uninstall roles, role services, and features.
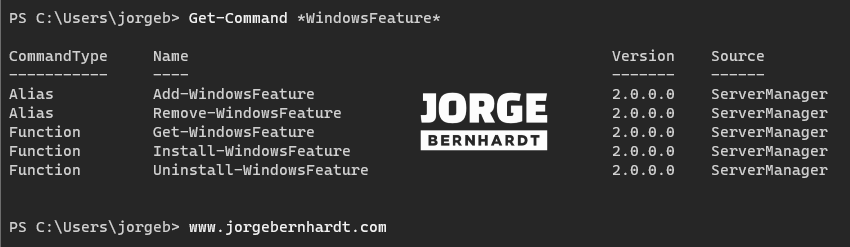
In PowerShell are available three cmdlets to interact with Windows Roles and Features.
- Get-WindowsFeature: Display the roles and features available to install or remove.
- Install-WindowsFeature: Install one or more roles and features.
- Uninstall-WindowsFeature: Removes one or more roles or features.
Import-Module -Name ServerManager
Install IIS using PowerShell #
To install the Web-Server role, you should use the** Install-WindowsFeature** cmdlet with the following syntax. The -IncludeManagementTools parameter installs the management tools needed to manage IIS.
Install-WindowsFeature -Name Web-Server -IncludeManagementTools
I do not recommend using -IncludeAllSubFeature parameter. Doing so will install all available IIS services, and for security reasons, you should only install what you need.
Import the WebAdministration module #
To make sure the IIS provider is loaded, import the WebAdministration module using the following command.
Import-Module `
    -Name WebAdministration
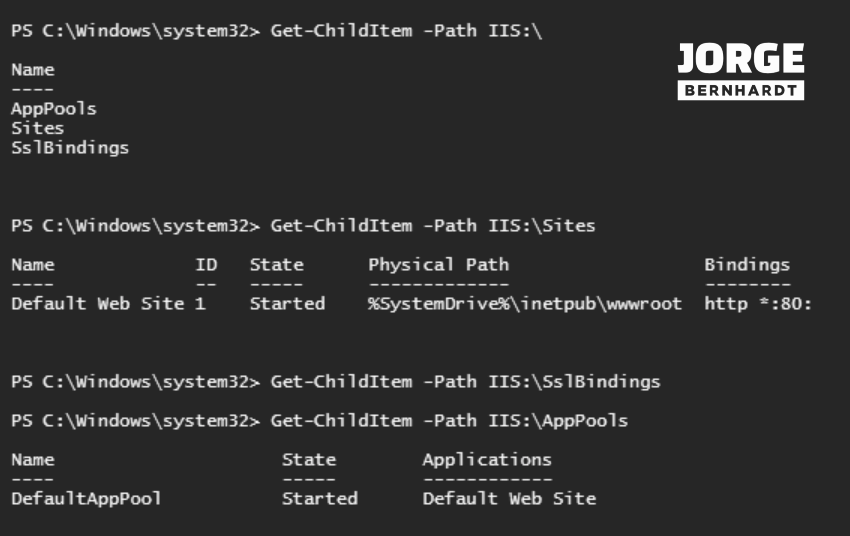
Verify the default configurations #
The above module import also loads the WebAdministration Powershell provider. This provider allows you to browse aspects of the web server, including sites, application pools, and SSL bindings on the host.
Get-PSProvider `
    -PSProvider WebAdministration

Get-ChildItem `
    -Path IIS:\\
Get-ChildItem `
    -Path IIS:\\Sites
Get-ChildItem `
    -Path IIS:\\AppPools
Get-ChildItem `
    -Path IIS:\\SslBindings
Managing IIS binding #
You can also view the default binding using the Get-WebBinding cmdlet.
Get-WebBinding `
    -name "Default Web Site"

Testing the default site using HTTP #
If you want to view the default page of the newly installed IIS host, you should open your favorite web browser and type the following URLs:
http://localhost
http://<_ServerName_>
http://<_IP Address_>
Configuring IIS for SSL #
In the following steps, you configure your server to provide a secure transfer of web pages. If you are configuring IIS as an internal web server, you must use an internal certificate authority to create the webserver certificate. If your web server is to be internet-facing, you should obtain a certificate from a public certificate authority. In this case, in a test environment, you will use self-signed certificates.
Create a self-signed certificate #
In this step, you create a self-signed certificate and store it in the local machine´s personal certificate store.
$Cert = New-SelfSignedCertificate `
    -dnsName "<Server FQDN>" `
    -CertStoreLocation cert:\LocalMachine\My`
    -KeyLength 2048 `
    -NotAfter (Get-Date).AddYears(1)
After the certificate is created, you should use the following commands to add it to the trusted root certificate store on the webserver.
$x509 = 'System.Security.Cryptography.X509Certificates.X509Store'
$Store = New-Object `
    -TypeName $x509 `
    -ArgumentList 'Root', 'LocalMachine'

$Store.Open('ReadWrite')
$store.Add($Cert)
$Store.Close()
Create an SSL binding #
To create a new binding for IIS that bind port 443 to HTTPS, you should use the **New-WebBinding **cmdlet with the following syntax.
New-WebBinding `
    -Name "Default Web Site" `
    -protocol https `
    -port 443
Assign the certificate to SSL binding #
In this step, you will instruct the IIS to use the self-signed certificate for any HTTPS traffic that reaches the default website.
$Cert | New-Item `
        -path IIS:\SslBindings\0.0.0.0!443

Testing the default site using HTTPS #
If you want to view the default page using HTTPS, you should open your favorite web browser and type the following URL:
https://<_Server FQDN_>
Thanks for reading my post. I hope you find it useful.
In my next post, I will show you How to configure IIS logging using PowerShell.
If you want to know more about Internet Information Server (IIS), check out this link.