How to deploy identical VMs in different Azure Availability Zones
Hello everyone, in this post I want to show you how to create two identical virtual machines in two different Azure Availability Zones using PowerShell.
An Availability Zone is a physically separate zone in an Azure region. Using Availability Zones you can protect your applications and data if an entire data center fails.
Prerequisites
- You created a Resource Group for these resources and the new ones deployed in this tutorial will join that group. If you want to know how to create a Resource Group, check out this link.
- You already created the necessary Virtual Network and subnet. If you want to know how to create a Virtual Network, check out this link.
Azure PowerShell Workaround #
If you want to know how to install the PowerShell Azure module on your machine, check out this link. The simplest way to get started is to sign in interactively at the command line.
Login-AzAccount
This cmdlet will bring up a dialog box prompting you for your email address and password associated with your Azure account. If you have more than one subscription associated with your mail account, you can choose the default subscription. To perform this task we will use the following commands:
Get-AzSubscription
Select-AzSubscription -Subscription "My Subscription"
Once you set your default subscription, you’re ready to start.
Set the variables #
Here, we define the characteristics of our environment and the resource’s properties.
#Resource Group
$location = "westeurope"
$resourceGroupName = "RG-DEMO-WE"

#Virtual Network
$networkName = "VNET-DEMO-WE"
$vnet = Get-AzVirtualNetwork `
    -Name $NetworkName `
    -ResourceGroupName $ResourceGroupName

#Virtual Machines
$prefixVM = "VM-"
$vmSize = "Standard_B2ms"
$publisherName = "MicrosoftWindowsServer"
$offer = "WindowsServer"
$skus = "2016-Datacenter"
$credential = Get-Credential
Select the available zones for the deployment #
First, you should check the available zones to deploy the virtual machines, for this you should use the Get-AzComputeResourceSku cmdlet with the following syntax. As you can see in the example, You should pass as parameters the region and the size of the virtual machines to obtain the available zones.
Get-AzComputeResourceSku `
    | where {$\_.Locations.Contains("westeurope") -and $\_.Name.Contains("Standard\_B2ms")}
$zones = @("1","2")
Azure Resource Deployment #
In this section, you create and deploy the virtual machines in Microsoft Azure with the features and properties previously declared.
ForEach ($zone in $zones)
 {
 $ComputerName=$PrefixVM+$zone
 $NIC = New-AzNetworkInterface `
            -Name ("NIC-"+$ComputerName) `
            -ResourceGroupName $ResourceGroupName `
            -Location $LocationName `
            -SubnetId $Vnet.Subnets[0].Id

 $VirtualMachine = New-AzVMConfig `
                    -VMName $ComputerName `
                    -VMSize $VMSize `
                    -Zone $zone
 $VirtualMachine = Set-AzVMOperatingSystem `
                    -VM $VirtualMachine `
                    -Windows `
                    -ComputerName $ComputerName `
                    -Credential $Credential `
                    -ProvisionVMAgent `
                    -EnableAutoUpdate

 $VirtualMachine = Add-AzVMNetworkInterface `
                    -VM $VirtualMachine `
                    -Id $NIC.Id
 $VirtualMachine = Set-AzVMSourceImage `
                    -VM $VirtualMachine `
                    -PublisherName $publisherName `
                    -Offer $offer `
                    -Skus $skus `
                    -Version latest

 New-AzVM `
    -ResourceGroupName $ResourceGroupName `
    -Location $LocationName `
    -VM $VirtualMachine `
    -Verbose
 }
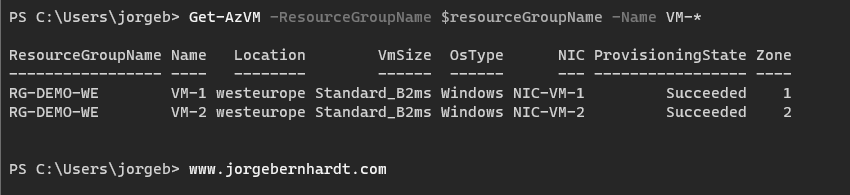
Verify the deployment #
To verify that the virtual machines are deployed correctly in the selected Azure Availability Zones, you can use the following command.
Get-AzVM `
    -ResourceGroupName $resourceGroupName `
    -Name VM-*