Create multiple identical VMs at once with Azure PowerShell
Hi, in this blog post, I want to show you a script that I used to implement several identical virtual machines at the same time with Azure PowerShell.
Prerequisites #
This tutorial assumes that you already have a Microsoft Azure account set up and you have the PowerShell Azure module on your machine installed. If you want to know how to install the PowerShell Azure module on your machine, check out this link. Assumptions:
- You created a Resource Group for these resources and the new ones deployed in this tutorial will join that group. If you want to know how to create a Resource Group, check out this link.
- You already created the necessary Virtual Network and subnet. If you want to know how to create a Virtual Network, check out this link.
The simplest way to get started is to sign in interactively at the command line.
Login-AzAccount
This cmdlet will bring up a dialog box prompting you for your email address and password associated with your Azure account. If you have more than one subscription associated with your mail account, you can choose the default subscription. To perform this task we will use the following commands:
Get-AzSubscription
Select-AzSubscription -Subscription "My Subscription"
Once you set your default subscription, you’re ready to start.
Set the variables #
Here, we define the characteristics of our environment and the resource’s properties.
#Resource Group
$locationName = "westeurope"
$ResourceGroupName = "AZ-RG-DEMO"

#Virtual Network
$networkName = "AZ-VNET"
$nicName = "NIC-"
$vnet = Get-AzVirtualNetwork `
    -Name $NetworkName `
    -ResourceGroupName $ResourceGroupName

#Virtual Machines
$computerNames = @("VM-01","VM-02")
$vmSize = "Standard\_B2ms"
$publisherName = "MicrosoftWindowsServer"
$offer = "WindowsServer"
$skus = "2016-Datacenter"

$credential = Get-Credential
Azure Resource Deployment #
In this section, you create and deploy the virtual machines in Microsoft Azure with the features and properties previously declared.
for($i = 0; $i -le $ComputerName.count -1; $i++)
{

 $NIC = New-AzNetworkInterface `
    -Name ($NICName+$ComputerName[$i]) `
    -ResourceGroupName $ResourceGroupName `
    -Location $LocationName `
    -SubnetId $Vnet.Subnets[0].Id

 $VirtualMachine = New-AzVMConfig `
    -VMName $ComputerName[$i] `
    -VMSize $VMSize
 $VirtualMachine = Set-AzVMOperatingSystem `
    -VM $VirtualMachine `
    -Windows `
    -ComputerName $ComputerName[$i] `
    -Credential $Credential `
    -ProvisionVMAgent  `
    -EnableAutoUpdate

 $VirtualMachine = Add-AzVMNetworkInterface `
    -VM $VirtualMachine `
    -Id $NIC.Id
 $VirtualMachine = Set-AzVMSourceImage `
    -VM $VirtualMachine `
    -PublisherName $publisherName `
    -Offer $offer `
    -Skus $skus `
    -Version latest

 New-AzVM `
    -ResourceGroupName $ResourceGroupName `
    -Location $LocationName `
    -VM $VirtualMachine `
    -Verbose
}
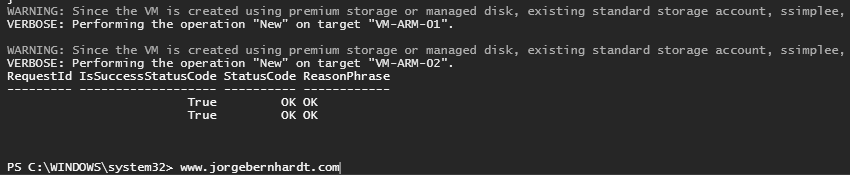
Verify the deployment #
As you can see, at the end of the script, a table with the result of the deployment will be displayed.