How to enable the Key vault's firewall
One of the security recommendations established by Microsoft in Azure Security Center is to enable the key vault’s firewall to prevent unauthorized traffic from reaching your key vault. This post will show you how to enable the firewall to ensure that only traffic from permitted networks can access your key vault using PowerShell and the Azure CLI.
Prerequisites #
- This tutorial assumes that you already have an Azure Key Vault. You can use an existing Key vault, or if you want to create a new one, check out this link.
Azure PowerShell Workaround #
If you want to know how to install the PowerShell Azure module on your machine, check out this link. The simplest way to get started is to sign in interactively at the command line.
Connect-AzAccount
This cmdlet will bring up a dialog box prompting you for your email address and password associated with your Azure account. If you have more than one subscription associated with your mail account, you can choose the default subscription. To perform this task, we will use the following commands:
Get-AzSubscription
Select-AzSubscription -Subscription "My Subscription"
Once you set your default subscription, you are ready to start.
Set the variables #
Here, we define the characteristics of our environment and the resource’s properties.
$resourceGroupName = 'RG-DEMO-NE'
$keyVaultName = 'KV-DEMO-NE'
$vNetName = 'VNET-DEMO-NE'
You should select the key vault you will work with and the network and subnet that will have access to the key vault. Optionally you can allow access to an IP or a range of public IPs that will also have access to the key vault. To improve the visualization of the following commands, I will store the resources into variables.
$keyvault = Get-AzKeyVault `
    -VaultName $keyVaultName `
    -ResourceGroupName $resourceGroupName

$virtualNetwork = Get-AzVirtualNetwork `
    -Name $vNetName `
    -ResourceGroupName $resourceGroupName

$Subnetid = $virtualNetwork.Subnets[1].id
Add a network rule to restrict access #
To add a new rule, you should use the Add-AzKeyVaultNetworkRule cmdlet with the following syntax.
Add-AzKeyVaultNetworkRule `
    -VaultName $keyvault.VaultName `
    -IpAddressRange "xxx.xxx.xxx.xxx/xx" `
    -VirtualNetworkResourceId $Subnetid
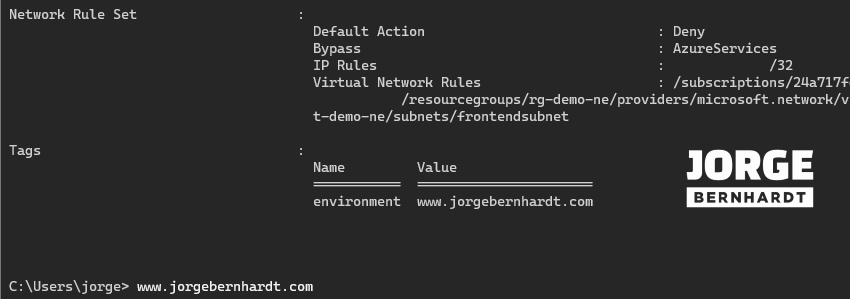
Enable the firewall on the Key vault #
After the rule is added, you should use the Update-AzKeyVaultNetworkRuleSet cmdlet to set the default firewall action to “Deny.” It is highly recommended to allow access to Azure services; for this, you should use the parameter -Bypass with the AzureServices value.
Update-AzKeyVaultNetworkRuleSet `
    -InputObject $keyvault `
    -DefaultAction Deny  `
    -Bypass AzureServices
Remove the network rule. #
If you want to remove the network rule, you should use the Remove-AzKeyVaultNetworkRule cmdlet with the following syntax. Note that if the default action in the firewall is “Deny, once the rule is removed, no service will be able to connect to the key vault.
Remove-AzKeyVaultNetworkRule `
    -VaultName $keyvault.VaultName `
    -IpAddressRange "xxx.xxx.xxx.xxx/xx" `
    -VirtualNetworkResourceId $Subnetid
Disable the firewall on the Key vault #
Finally, if you want to allow unrestricted access to the key vault, you should use the following command.
Update-AzKeyVaultNetworkRuleSet `
    -InputObject $keyvault `
    -DefaultAction Allow
Azure CLI Workaround #
You can use it in your browser with Azure Cloud Shell or install it on your machine. If you want to know how to install the Azure CLI, check out this link.
Add a network rule to restrict access #
To add a new rule, you should use the following command; the required parameters are the key vault, the network, and the subnet that will have access to the key vault. Optionally, you can specify an IP or a range of public IPs that will also have access to the key vault.
az keyvault network-rule add --name KV-DEMO-NE \\
--ip-address xxx.xxx.xxx.xxx \\
--resource-group RG-DEMO-NE \\
--subnet frontendsubnet \\
--vnet-name VNET-DEMO-NE
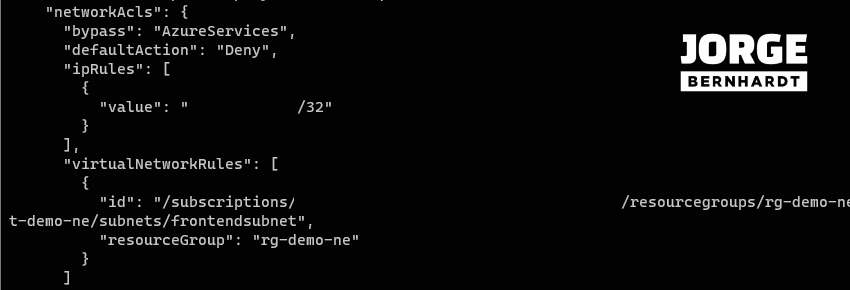
Enable the firewall on the Key vault #
Set the default action in the firewall to “Deny” for all connections not contemplated in the created rule. It is highly recommended to allow access to Azure services; for this, you should use the parameter –bypass with the AzureServices value.
az keyvault update \
-n KV-DEMO-NE \
-g RG-DEMO-NE \
--default-action deny \
--bypass AzureServices
Remove the network rule #
If you want to delete the network rule, you must use the following command. Note that if the default action in the firewall is “Deny, once the rule is removed, no service will be able to connect to the key vault.
az keyvault network-rule remove \
--name KV-DEMO-NE \
--ip-address xxx.xxx.xxx.xxx \
--resource-group RG-DEMO-NE \
--subnet frontendsubnet \
--vnet-name VNET-DEMO-NE
Disable the firewall on the Key vault #
Finally, if you want to allow unrestricted access to the key vault, you should use the following command.
az keyvault update \
-n KV-DEMO-NE \
-g RG-DEMO-NE \
--default-action allow
Thanks for reading my post. I hope you find it useful.
If you want to know more about Security recommendations for Azure key vaults, check out this link.