How to use a VM system-assigned managed identity to access Azure Key Vault
Hi, In a previous post, I showed you how to enable system-assigned managed identity on an Azure virtual machine. Today, I want to show you how to assign a managed identity to access an Azure resource securely. In this case, I will use an Azure key vault. When writing this article, we have two options for managing access control to an Azure Key Vault: the policy-based model and the new role-based access control model ( RBAC). If you want to know how to migrate to the new access model based on RBAC, this link may be of your interest.
Prerequisites #
- This tutorial assumes that you already have an Azure Key Vault. You can use an existing Key vault, or if you want to create a new one, check out this link.
Azure PowerShell Workaround #
If you want to know how to install the PowerShell Azure module on your machine, check out this link. The simplest way to get started is to sign in interactively at the command line.
Connect-AzAccount
This cmdlet will bring up a dialog box prompting you for your email address and password associated with your Azure account. If you have more than one subscription associated with your mail account, you can choose the default subscription. To perform this task, we will use the following commands:
Get-AzSubscription
Select-AzSubscription -Subscription "My Subscription"
Once you set your default subscription, you’re ready to start.
Set the variables #
Here, we define the characteristics of our environment and the resource’s properties.
$resourceGroupName="RG-DEMO-WE"
$vmName="VM-DEMO-WE"
$keyVaultName="KV-DEMO-WE"
The following commands will store the Service Principal ID and Key Vault ID in variables to pass as a parameter in the next steps.
$spID = (Get-AzVM `
    -Name $vmName `
    -ResourceGroupName $resourceGroupName).identity.principalid

$scope=(Get-AzKeyVault `
    -Name $keyVaultName `
    -ResourceGroupName $resourceGroupName).ResourceId
Grant the managed identity access to your Azure Key Vault #
Using Azure RBAC permission model #
To assign a specific RBAC role to a service principal, you should use the New-AzRoleAssignment cmdlet with the following syntax.
New-AzRoleAssignment `
    -ObjectId $spID `
    -RoleDefinitionName "Key Vault Secrets User" `
    -Scope $scope
Lists Azure RBAC role assignments at the specified scope #
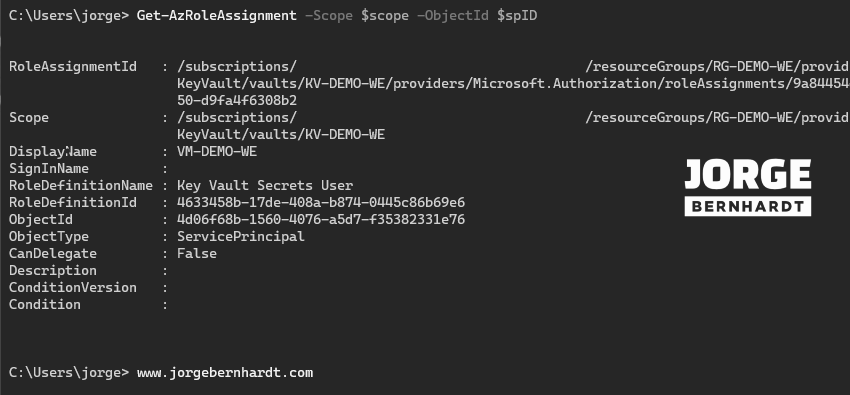
If you want to check the RBAC role assignments at the specified scope, you should use the Get-AzRoleAssignment cmdlet with the following syntax.
Get-AzRoleAssignment `
    -Scope $scope `
    -ObjectId $spID
Using the vault access policy permissions model #
Instead, use the vault access policy model to grant permissions for a principal to perform operations on the Key Vault. You should use the Set-AzKeyVaultAccessPolicy cmdlet with the following syntax.
Set-AzKeyVaultAccessPolicy `
    -VaultName $keyVaultName `
    -ObjectId $spID `
    -PermissionsToSecrets list,get
Get Azure Key Vault access policy #
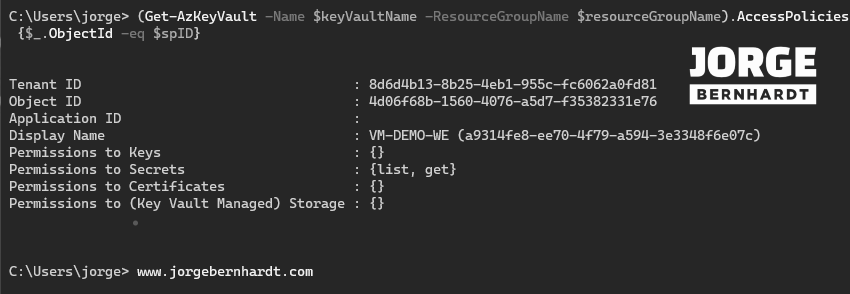
If you want to check the permission assignments in the specified scope, you should use the following command.
(Get-AzKeyVault `
    -Name $keyVaultName `
    -ResourceGroupName $resourceGroupName).AccessPolicies `
    | where-object {$_.ObjectId -eq $spID}
Check the changes made #
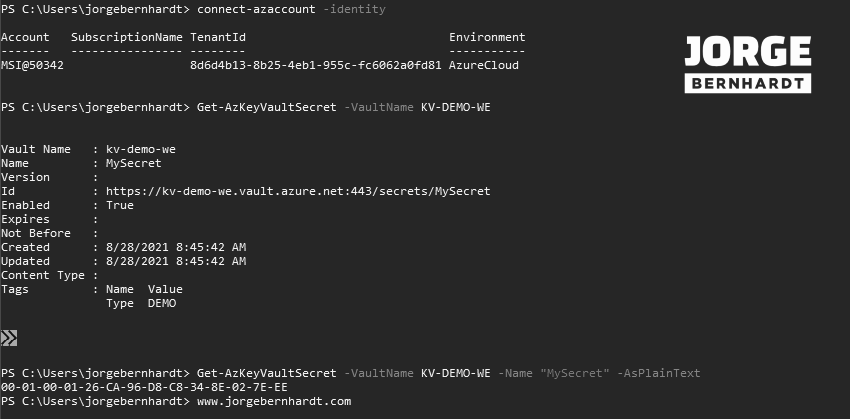
Once the above steps are done, I will show you how to retrieve a secret, which you had previously created in the Key Vault, using the identity of the virtual machine. To do this, you have to connect to the VM in question, either via remote desktop, SSH, or azure bastion and from the VM itself, you need to run the following commands. Important: The VM must have the Az PowerShell module installed.
Connect-azaccount `
    -identity

Get-AzKeyVaultSecret `
    -VaultName KV-DEMO-WE

Get-AzKeyVaultSecret `
    -VaultName KV-DEMO-WE `
    -Name "MySecret" `
    -AsPlainText
Azure CLI Workaround #
In this case, we will use Azure Cloud Shell, a browser-based shell built into Azure Portal. This allows us to use the Azure command-line tools (Azure CLI and Azure PowerShell) directly from a browser. If you want to know more about Azure Cloud Shell, check out this link. First, we define the characteristics of our environment and store the values in variables.
resourceGroupName='RG-DEMO-WE'
vmName="VM-DEMO-WE"
keyVaultName="KV-DEMO-WE"
The following commands will store the Service Principal ID and Key Vault ID in variables to pass as a parameter in the next steps.
scope=$(az keyvault show \
-n $keyVaultName \
-g $resourceGroupName \
--query id \
-o tsv)

spID=$(az resource list \
-n $vmName \
--query [*].identity.principalId \
--out tsv)
Grant the managed identity access to your Azure Key Vault #
Using Azure RBAC permission model #
To assign a specific RBAC role to a service principal, you should use the following command.
az role assignment create \
--assignee $spID \
--role 'Key Vault Secrets User' \
--scope $scope
Lists Azure RBAC role assignments at the specified scope #
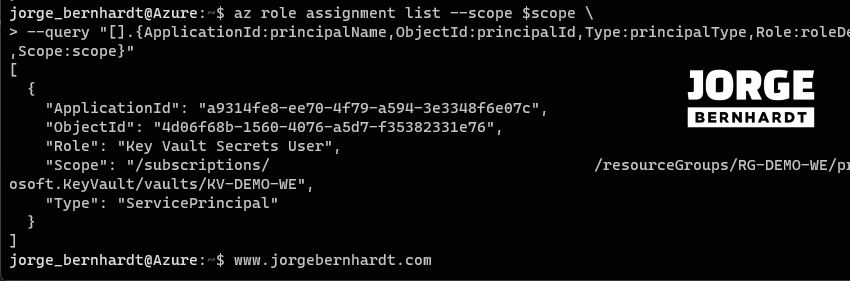
If you want to check the RBAC role assignments at the specified scope, you should use the following command.
az role assignment list \
--scope $scope \
--query "[].{ApplicationId:principalName,ObjectId:principalId,Type:principalType,Role:roleDefinitionName,Scope:scope}"
Using the vault access policy permissions model #
Instead, use the vault access policy model to grant permissions for a principal to perform operations on the Key Vault. You should use the following command.
az keyvault set-policy \
--name $keyVaultName \
--object-id $spID \
--secret-permissions get list
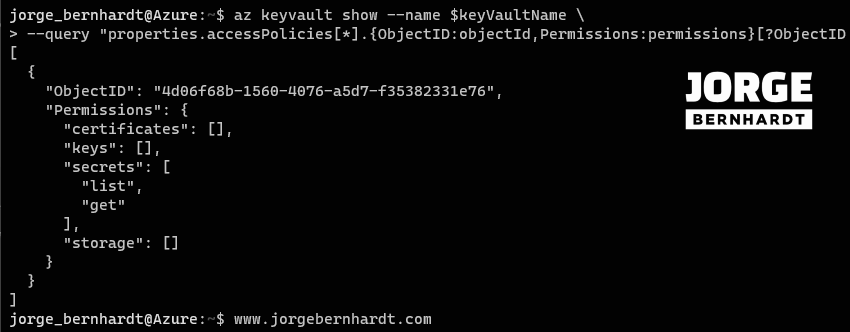
Get Azure Key Vault access policy #
If you want to check the permission assignments in the specified scope, you should use the following command.
az keyvault show \
--name $keyVaultName \
--query "properties.accessPolicies[*].{ObjectID:objectId,Permissions:permissions}[?ObjectID =='$spID']"
Check the changes made #
Once the above steps are done, I will show you how to retrieve a secret, which you had previously created in the Key Vault, using the identity of the virtual machine. To do this, you have to connect to the VM in question, either via remote desktop, SSH, or azure bastion, and from the VM itself, you need to run the following commands. Important: The VM must have the Azure Command-Line Interface (CLI) tool installed.
az login \
--identity

az keyvault secret list \
--vault-name KV-DEMO-WE

az keyvault secret show \
--name MySecret \
--vault-name KV-DEMO-WE

Thanks for reading my post. I hope you find it helpful.
For more information about managed identities for Azure resources, check this link.