Creating Restore Points for Azure VMs using Azure CLI
If you need to perform a quick ad-hoc backup of your virtual machine before maintenance that allows you to take consistent snapshots of all managed disks attached to your virtual machine, you should try Azure restore points.
Today I’ll show you how to create a VM restore point and create a new VM from a restore point using the Azure CLI.
Some concepts that we must keep in mind before starting.
- Restore point collection
- A restore point collection contains all restore points for a specific virtual machine.
- A restore point collection can be created in the same region as the VM or in a different region.
- Restore point
- Restore points are only supported for managed disks.
- The restore point name must be unique within the collection.
- Restore points support both app consistent and crash-consistent snapshots.
Prerequisites - This tutorial assumes that you already have a virtual machine. You can use an existing VM or check out this link to create a new one.
Azure CLI Workaround #
I use the Bash environment in Azure Cloud Shell, but you can execute the CLI commands locally. You must install the Azure CLI on your computer and log in to the Azure CLI with the az login command.
Once logged in, I define the variables with the names of the resources to make the commands easier to read.
resourceGroupName="RG-DEMO-WE"
location="westeurope"
vmName="VM-DEMO-WE"
Note that it will be necessary to have the VM ID. For this, you will use the following command.
vmId=$(az vm show --name $vmName --resource-group $resourceGroupName --query "id" -o tsv)
Restore point collection #
Create a restore point collection #
Before creating restore points for your virtual machine, you must create a collection of restore points using the az restore-point collection create command.
rpcName="RPC-DEMO-WE"

az restore-point collection create \
--collection-name $rpcName \
--resource-group $resourceGroupName \
--source-id $vmId \
--location $location \
--tags Environment="www.JorgeBernhardt.com"
Check the properties of the resource created #
To check the information about the collection of restore points, use the az restore-point collection show command as follows.
az restore-point collection show \
--collection-name $rpcName \
--resource-group $resourceGroupName \
--restore-points \
--output table
Update the restore point collection #
Once a restore point collection is created, only the tags can be modified. To do this, use the command az restore-point collection update command as follows.
az restore-point collection update \
--collection-name $rpcName \
--resource-group $resourceGroupName \
--tags Environment="DEMO"
Get the list of restore point collections #
To list existing restore point collections, you have two similar commands. The first az restore-point collection list shows the collections within a specified resource group, and the second az restore-point collection list-all shows all existing collections in the subscription.
az restore-point collection list \
--resource-group $resourceGroupName \
--output table

az restore-point collection list-all \
--output table
Restore point #
On restore point creation, you can use the –consistency-mode parameter to specify the consistency mode used for the snapshot. Currently, only CrashConsistent is accepted and is the default value.
Create a restore point #
First, set the restore point name, which must be unique within the collection.
rpName="RP-DEMO_AllDisks"
And then, create a virtual machine restore point using the az restore-point create command as follows.
az restore-point create \
--collection-name $rpcName \
--resource-group $resourceGroupName \
--name $rpName
Important: Please note that updating its properties is not allowed once the restore point is created.
Exclude OS disk #
When creating a restore point, you can exclude disks that you do not want to be part of the restore point. For this, you should perform the following steps. In case you need to exclude the OS disk, First set the restore point name, which must be unique within the collection, and then get the resource ID of the disk you want to exclude from the restore point.
rpName="RP-DEMO_DataDisk"
excludeOsDiskId=$(az vm show --name $vmName --resource-group $resourceGroupName --query "storageProfile.osDisk.managedDisk.id" -o tsv)
Now using the following command, create the restore point, indicating in the parameter –-exclude-disks the disk identifier you want to exclude.
az restore-point create \
--collection-name $rpcName \
--resource-group $resourceGroupName \
--name $rpName \
--exclude-disks $excludeOsDiskId
Exclude Data disk #
In case you need to exclude the data disk, First set the restore point name, which must be unique within the collection, and then get the resource id of the disk you want to exclude from the restore point.
rpName="RP-DEMO_OSDisk"
excludeDataDiskId=$(az vm show --name $vmName --resource-group $resourceGroupName --query "storageProfile.dataDisks[0].managedDisk.id" -o tsv)
Another example would be to exclude the data disk, First, set the name of the restore point, which must be unique within the collection, and then get the resource id of the disk you want to exclude from the restore point.
az restore-point create \
--collection-name $rpcName \
--resource-group $resourceGroupName \
--name $rpName \
--exclude-disks $excludeDataDiskId
Check the properties of the created restore point #
You can verify the creation of a virtual machine restore point with the az restore-point show command as follows.
az restore-point show \
--collection-name $rpcName \
--resource-group $resourceGroupName \
--name $rpName \
--instance-view
Create a Disk from a disk restore points #
To create a VM from a restore point, you must first restore the disks individually from each disk restore point. In the following example, we will only restore the operating system disk.
To get the restore point resource ID, use the following command, and this value will be used as a parameter in creating the managed disk.
osDiskRestorePoint=$(az restore-point show \
--collection-name $rpcName \
--resource-group $resourceGroupName \
--name $rpName \
--query "sourceMetadata.storageProfile.osDisk.diskRestorePoint.id" \
--output tsv)
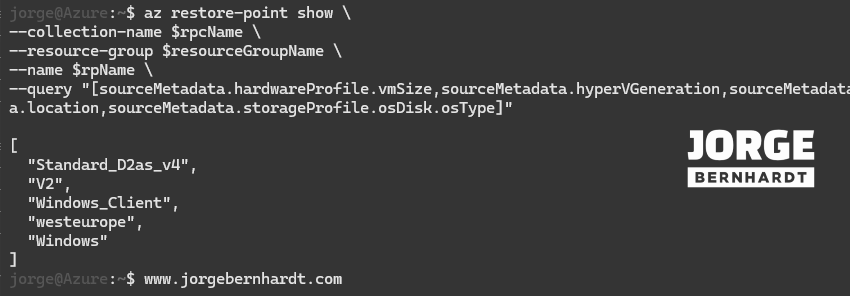
Use the following command to get information about the original disk, which may be helpful when creating the new managed disk.
az restore-point show \
--collection-name $rpcName \
--resource-group $resourceGroupName \
--name $rpName \
--query "[sourceMetadata.hardwareProfile.vmSize,sourceMetadata.hyperVGeneration,sourceMetadata.licenseType,sourceMetadata.location,sourceMetadata.storageProfile.osDisk.osType]"
Once you have all the necessary information, you can create the managed disk using the following command.in the –SKU parameter, you don’t have to specify the same SKU as the original disk, but if you don’t set this parameter, the default value is Premium_LRS.
rpManagedDiskName="OSDisk_rp"
az disk create \
--resource-group $resourceGroupName \
--name $rpManagedDiskName \
--sku StandardSSD_LRS \
--size-gb 128 \
--hyper-v-generation V2 \
--source $osDiskRestorePoint \
--tags Environment="www.JorgeBernhardt.com"
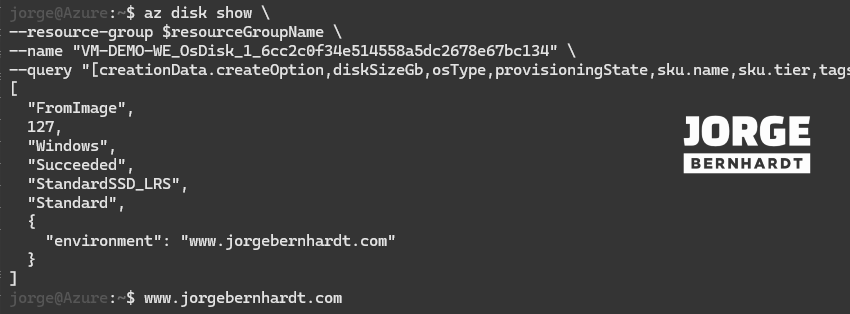
To verify that the deployment was successful, run the following command.
az disk show \
--resource-group $resourceGroupName \
--name $rpManagedDiskName \
--query "{CreationMethod:creationData.createOption,DiskSize:diskSizeGb,Os:osType,State:provisioningState,SKU:sku.name,Tier:sku.tier,tags:tags}"
Create a VM and attach the restored disks #
In this section, you will create a VM from an existing managed operating system disk created from a restore point.
First, the name of the new VM is set, and then to obtain the resource ID of the managed disk, use the following command, and this value will be used as a parameter in the creation of the VM.
newVMName="VM-RPDEMO-WE"
managedDiskId=$(az disk show --name $rpManagedDiskName --resource-group $resourceGroupName --query [id] -o tsv)
Once you have the necessary information, use the following command to create a virtual machine attaching the restored disk as the operating system.
az vm create \
--name $newVMName \
--resource-group $resourceGroupName \
--attach-os-disk $managedDiskId \
--os-type Windows \
--license-type "Windows_client" \
--size "Standard_D2as_v4" \
--tags Environment="www.JorgeBernhardt.com"
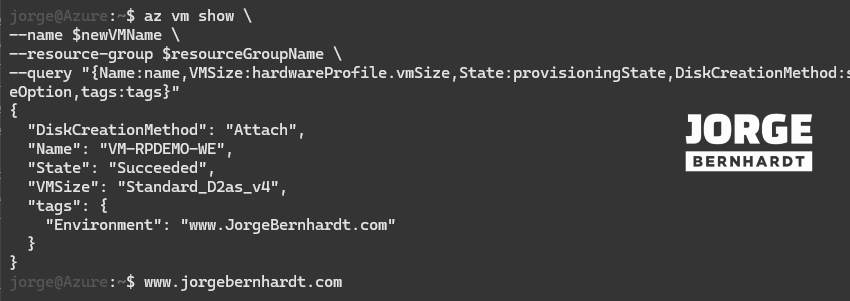
Finally, check the status and characteristics of the virtual machine with the following command.
az vm show \
--name $newVMName \
--resource-group $resourceGroupName \
--query "{Name:name,VMSize:hardwareProfile.vmSize,State:provisioningState,DiskCreationMethod:storageProfile.osDisk.createOption,tags:tags}"
Delete Restore points #
To delete a restore point, you should use the following command.
az restore-point delete \
--collection-name $rpcName \
--resource-group $resourceGroupName \
--name $rpName \
--yes
Delete Restore point Collections #
But if you want to delete all restore points created, you can use the following command to delete the restore point collection resource.
az restore-point collection delete \
--collection-name $rpcName \
--resource-group $resourceGroupName \
--yes
Thanks for reading my post. I hope you find it helpful.
Check out this link for more information about virtual machine restore points.