How to change the PSK of the Azure VPN Gateway Connection
When deploying a VPN Gateway in Azure, we are limited to using pre-shared keys (PSK) for authentication. As you know, Azure generates a Pre-Shared Key (PSK) when the VPN tunnel is created. But you can change the autogenerated PSK to your own, and this post will show you how to change the PSK (Pre-Shared Key) using PowerShell and Azure CLI.
Prerequisites #
- This tutorial assumes that you already have an Azure VPN Gateway. You can use an existing VPN Gateway, or if you want to create a new one, check out this link.
Important: The key MUST be printable ASCII characters.
Azure PowerShell Workaround #
If you want to know how to install the PowerShell Azure module on your machine, check out this link. The simplest way to get started is to sign in interactively at the command line.
Connect-AzAccount
This cmdlet will bring up a dialog box prompting you for your email address and password associated with your Azure account. If you have more than one subscription associated with your mail account, you can choose the default subscription. To perform this task, we will use the following commands:
Get-AzSubscription
Select-AzSubscription -Subscription "My Subscription"
Once you set your default subscription, you’re ready to start.
Set the variables #
Here, we define the characteristics of our environment and the resource’s properties.
$resourceGroupName="RG-DEMO-NE"
$vpntunnelName='AZ-Local'
In my case, I know the name of the connection or tunnel to which I want to change the PSK, but if you don’t know the connection’s name, the following command can be helpful for you. Get a list of Virtual Network Gateway Connections To get the virtual network gateway connections within your resource group. You should use the Get-AzVirtualNetworkGatewayConnection cmdlet with the following syntax.
Get-AzVirtualNetworkGatewayConnection `
    -Name * `
    -ResourceGroupName $resourceGroupName `
    | Select-Object Name, ProvisioningState, ConnectionType, Location
Show the shared key #
If you want to view the shared key used for the selected connection, you should use the Get-AzVirtualNetworkGatewayConnectionSharedKey cmdlet with the following syntax.
Get-AzVirtualNetworkGatewayConnectionSharedKey `
    -name $vpntunnelName `
    -ResourceGroupName $resourceGroupName
Reset the shared key #
To reset or autogenerate a new key for the selected connection, you should use the Reset-AzVirtualNetworkGatewayConnectionSharedKey cmdlet with the following syntax.
Reset-AzVirtualNetworkGatewayConnectionSharedKey `
    -name $vpntunnelName `
    -KeyLength 32 `
    -ResourceGroupName $resourceGroupName
You should use the -keyLenght parameter to indicate the PSK length.
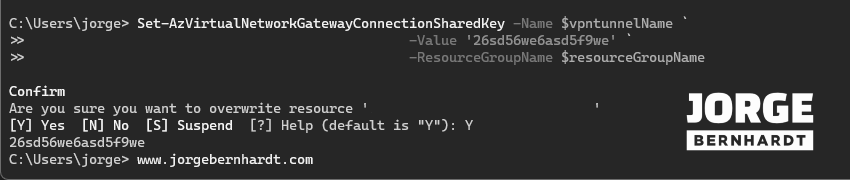
Update the shared key #
But if you want to change the auto-generated PSK to yours, you should use the Set-AzVirtualNetworkGatewayConnectionSharedKey Key cmdlet. The PSK value you set here must match the value you are using for your local VPN device.
Set-AzVirtualNetworkGatewayConnectionSharedKey `
    -Name $vpntunnelName `
    -Value '26sd56wree6asd5f9we' `
    -ResourceGroupName $resourceGroupName
Azure CLI Workaround #
In this case, we will use Azure Cloud Shell, a browser-based shell built into Azure Portal. This allows us to use the Azure command-line tools (Azure CLI and Azure PowerShell) directly from a browser. If you want to know more about Azure Cloud Shell, check out this link. First, we define the characteristics of our environment and store the values in variables.
resourceGroupName="RG-DEMO-NE"
vpntunnelName='AZ-Local'
In my case, I know the name of the connection or tunnel to which I want to change the PSK, but if you don’t know the connection’s name, the following command can be helpful for you.
Get a list of Virtual Network Gateway Connections To get the virtual network gateway connections within your resource group. You should use the following command.
az resource list \
-g $resourceGroupName \
--resource-type "Microsoft.Network/virtualNetworkGateways"
Show the shared key #
If you want to view the shared key used for the selected connection, you should use the following command.
az network vpn-connection shared-key show \
--connection-name $vpntunnelName \
--resource-group $resourceGroupName
Reset the shared key #
To reset or autogenerate a new key for the selected connection, you should use the following command. You should use the --key-Lenght parameter to indicate the PSK length.
az network vpn-connection shared-key reset \
--connection-name $vpntunnelName \
--key-length 32 \
--resource-group $resourceGroupName
Update the shared key #
But if you want to change the auto-generated PSK for yours, you have to use the following command. Remember that the PSK value you set here must match the value you are using for your local VPN device.
az network vpn-connection shared-key update \
--connection-name $vpntunnelName \
--value '26sd56we6asd5f9we' \
--resource-group $resourceGroupName
