How to Enable Azure Web App diagnostic logs
Azure Application Service web applications provide diagnostic functionality to logging information from the web server on which the web application runs and the web application itself. These logs provide an excellent way to detect problems and analyze how your application works but this functionality is disabled by default. In this post, I want to show you how to enable diagnostic logs in your Azure web applications using PowerShell and the Azure CLI. There are two categories of diagnostic logs:
Application diagnostic logs #
Record the messages generated by your application code. When you enable application logs, you must specify the log level: error, warning, information, and verbose and storage location: file system or Azure Storage blobs.
Web Server diagnostic logs #
These Logs contain information produced by the web server that the Web App is running on. There are three types of diagnostic logs that you can enable and each of them is stored in a different directory as shown below.
- Web server logging ⇒ d:\home\logfiles\http\rawlogs\
- Detailed Error Messages ⇒ d:\home\logfiles\DetailedErrors\
- Failed request tracing ⇒ d:\home\logfiles\W3SVC<Random#>\
Prerequisites #
- This tutorial assumes that you already have a Microsoft Azure account configured.
- You already have Web Apps created and properly configured. If you want to know how to create it, see this link.
Azure PowerShell Workaround #
If you want to know how to install the PowerShell Azure module on your machine, check out this link. The simplest way to get started is to sign in interactively at the command line.
Connect-AzAccount
This cmdlet will bring up a dialog box prompting you for your email address and password associated with your Azure account. If you have more than one subscription associated with your mail account, you can choose the default subscription. To perform this task, we will use the following commands:
Get-AzSubscription
Select-AzSubscription -Subscription "My Subscription"
Once you set your default subscription, you’re ready to start.
Set the variables #
Here, we define the characteristics of our environment and the resource’s properties.
$resourceGroupName = "RG-DEMO-NE"
$location = "North Europe"
To retrieve the web app, use the Get-Az WebApp cmdlet with the following syntax.
$webApp = Get-AzWebApp `
    -Name "wApp-DEMO-PS" `
    -ResourceGroupName $resourceGroupName
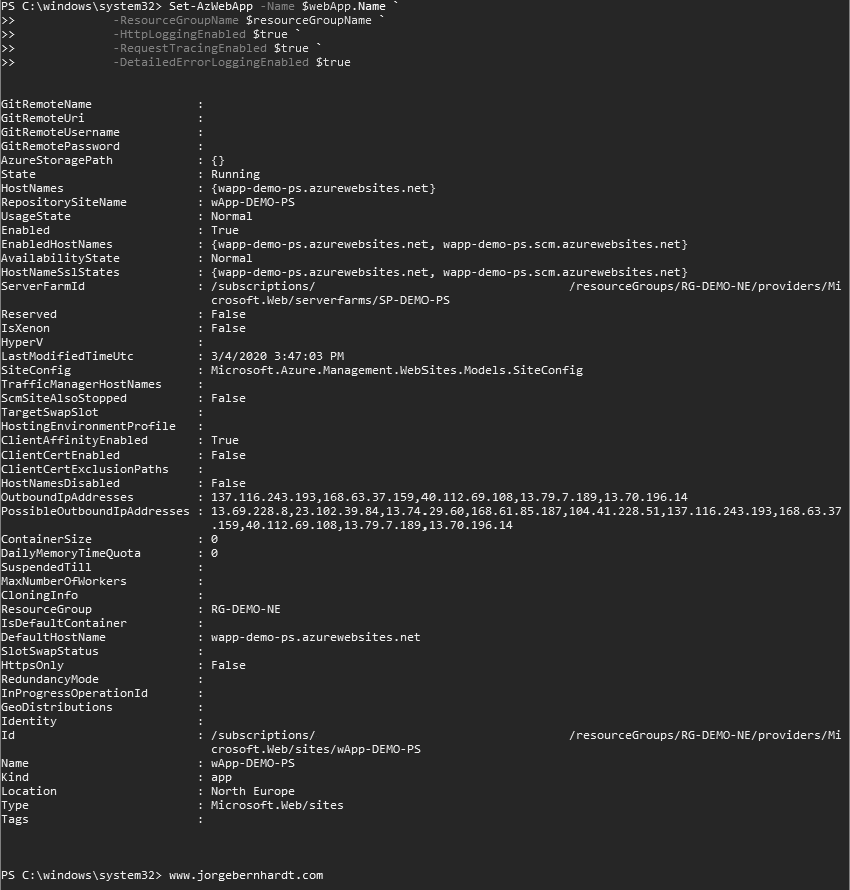
Enable diagnostics logging for a Web App #
To Enable the diagnostic logs for a Web App, you should use the Set-AzWebApp cmdlet with the following syntax.
Set-AzWebApp `
    -Name $webApp.Name `
    -ResourceGroupName $resourceGroupName `
    -HttpLoggingEnabled $true `
    -RequestTracingEnabled $true `
    -DetailedErrorLoggingEnabled $true
Application diagnostic logs: so far, there is no cmdlet in the new Az module to enable the application diagnostic (either File System or Blob) as shown in this GitHub thread. At the moment the alternatives to activate this type of log are the Azure Portal or using Azure CLI.
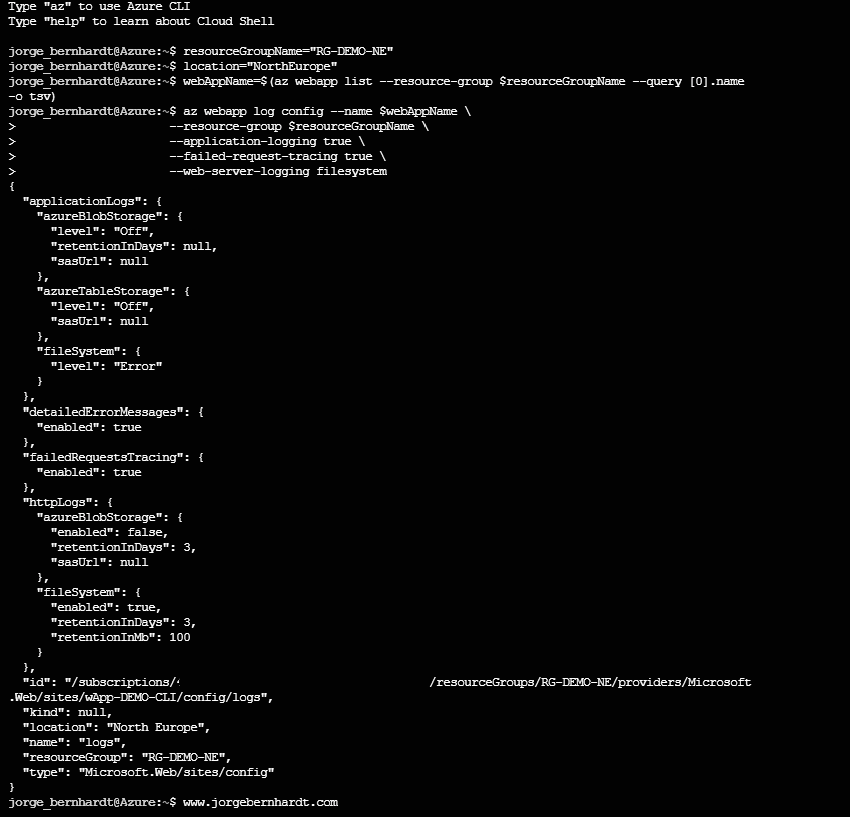
Azure CLI Workaround #
In this case, we will use Azure Cloud Shell, a browser-based shell built into Azure Portal. This allows us to use the Azure command-line tools (Azure CLI and Azure PowerShell) directly from a browser. If you want to know more about Azure Cloud Shell, check out this link
Set the variables #
Here, we define the characteristics of our environment and the resource’s properties.
resourceGroupName="RG-DEMO-NE"
location="NorthEurope"
With the following command, we store the name of the web app in a variable. Keep in mind that if you have more than one web application, you must modify the index number to correspond to the desired WebApp.
webAppName=$(az webapp list --resource-group $resourceGroupName --query [0].name -o tsv)
Enable diagnostics logging for a Web App #
Once the variables are set, you can enable the Application Service logs, using the following command. To set the log level, you should use the --level parameter, the accepted values are error, information, verbose, and warning.
az webapp log config \
--application-logging filesystem \
--detailed-error-messages true \
--failed-request-tracing true \
--level information \
--name $webAppName \
--resource-group $resourceGroupName \
--web-server-logging filesystem
Retrieving Diagnostic Logs #
In the upcoming post, I will show you how to retrieve diagnostic logs using Azure CLI.
Thanks for reading my post. I hope you find it useful.
If you want to know more about Azure Web Apps, check out this link.