How to implement Azure Ultra Disks
Recently, Microsoft announced the general availability of Microsoft Azure Ultra Disks. These new managed disks offer incredible performance with a latency of less than milliseconds, ideal for use on Azure VMs running mission-critical workloads. In this blog post, I want to talk with you about Azure Ultra Disks and how to use Azure PowerShell to deploy this type of disks in your VMs.
Some characteristics of Azure Ultra disks are: #
- The capacity ranges from 4 GB up to 64 TB.
- Ultra disks can only be used as data disks and only support 4k physical sector size.
- Ultra disks include the ability to dynamically change disk performance without the need to restart your virtual machines (VMs).
Features not compatible with Azure Ultra disks at the time of publication of this article: #
- Availability sets.
- Virtual machine scale sets.
- Azure Disk Encryption.
- Disk snapshots.
- Azure Backup.
- Azure Site Recovery.
Once explained the characteristics of the Azure Ultra disks we can begin this tutorial.
Azure PowerShell Workaround #
Prerequisites
This tutorial assumes that you already have a Microsoft Azure account set up and you have the PowerShell Azure module on your machine installed. If you want to know how to install the PowerShell Azure module on your machine, check out this link. Assumptions:
- You created a Resource Group for these resources and the new ones deployed in this tutorial will join that group. If you want to know how to create a Resource Group, check out this link.
- You already created the necessary Virtual Network and subnet. If you want to know how to create a Virtual Network, check out this link.
The simplest way to get started is to sign in interactively at the command line.
Connect-AzAccount
This cmdlet will bring up a dialog box prompting you for your email address and password associated with your Azure account. If you have more than one subscription associated with your mail account, you can choose the default subscription. To perform this task, we will use the following commands:
Get-AzSubscription
Select-AzSubscription -Subscription "My Subscription"
Once you set your default subscription, you’re ready to start.
Check your subscription #
If you want to check if your subscription is enabled for ultra disks, use the following commands:
Get-AzProviderFeature `
    -ProviderNamespace Microsoft.Compute `
    -FeatureName UltraSSD

Set the variables #
Here, we define the characteristics of our environment and the resource’s properties.
#Resource Group#
$resourceGroupName = "RG-DEMO-NE"
$location = "northeurope"

#Virtual Machines - At the time of this publication, only DsV3 and EsV3 VM families support ultra disks#
$vmName ="VM-DEMO-Udisk"
$vmSize = "Standard_D2s_v3"
$vmImage = "Win2019datacenter"

#Virtual Network#
$vNetName = "DEMO-VNET"

#Ultra Disk - The number indicated in the $lun variable depends on the data disks connected to your VM#
$udiskName = "UltraDiskData01"
$lun = '1'
Determine the availability zone. #
To determine in which zone, you can deploy your ultra disk, run the following command:
(Get-AzComputeResourceSku | where-object {$_.Locations.Contains($location) -and ($_.Name -eq $vmSize) -and $_.LocationInfo[0].ZoneDetails.Count -gt 0})[0].LocationInfo[0].ZoneDetails
Currently, only three zones support ultra disks, they are (1)East US 2, (2)Southeast Asia, and (3)North Europe.

$zone = '3'
Create an Ultra Disk #
To create an ultra disk using Azure PowerShell, use the following commands:
$diskconfig = New-AzDiskConfig `
    -Location $location `
    -DiskSizeGB 64 `
    -DiskIOPSReadWrite 19200 `
    -DiskMBpsReadWrite 2000 `
    -AccountType UltraSSD_LRS `
    -CreateOption Empty `
    -zone $zone

$udisk = New-AzDisk `
    -DiskName $udiskName `
    -ResourceGroupName $resourceGroupName `
    -Disk $diskconfig

Create a VM that is capable of using Ultra Disks #
To perform the deployment of the virtual machine, use the New-AzVM** cmdlet with the following syntax:
$vm = New-AzVM `
    -Name $vmName `
    -ResourceGroupName $resourceGroupName `
    -Location $location `
    -Zone $zone `
    -VirtualNetworkName $vNetName `
    -Image $vmImage `
    -Size $vmSize `
    -EnableUltraSSD

Attach an Ultra Disk to a VM #
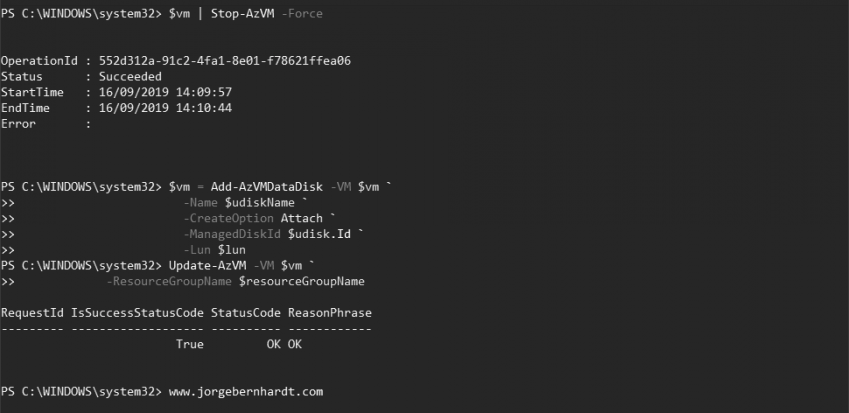
finally, we perform the attachment of the virtual disk, using the following commands: Important: Stop and deallocate the VM before attaching an Ultra Disk for the first time.
$vm | Stop-AzVM -Force

$vm = Add-AzVMDataDisk `
    -VM $vm `
    -Name $udiskName `
    -CreateOption Attach `
    -ManagedDiskId $udisk.Id `
    -Lun $lun

Update-AzVM `
    -VM $vm `
    -ResourceGroupName $resourceGroupName
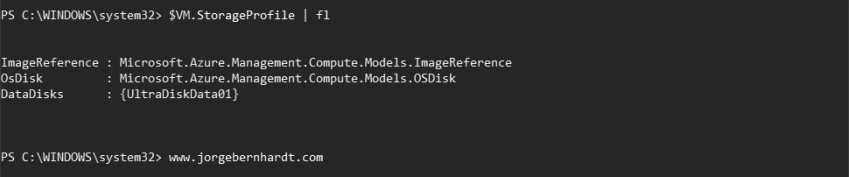
Verify deployment #
As you can see in the following screenshot, we already have the disk in our VM.
$VM.StorageProfile | Format-List
In the next post, I will perform performance tests and comparisons with the other types of storage in Azure.
Thanks for reading my post. I hope you find it useful.
If you want to know more about Azure Ultra Disks, check out this link.